SLAM Settings Definitions
Active Project
Concept
Only the active project(liscan will display green, as shown in the following picture) can set SLAM,including mode settings,SLAM settings, coordinate system settings, output settings, etc.
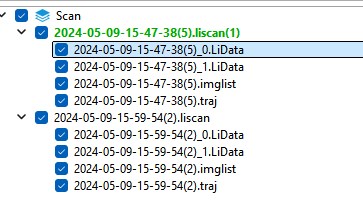
How to set the current active Project
liscan right-click,"Set Active Project").
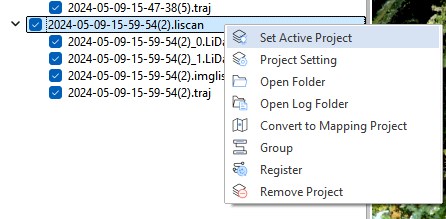
Mode
6 built-in modes: General, Indoor, Forestry, Tunnel, UAV, and CAR, with General mode as the default. Each mode corresponds to different SLAM algorithms and output settings.
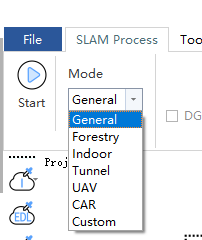
When using handheld devices with CAR and UAV kits, the corresponding SLAM processing mode needs to be used.
Each mode allows parameter modification, and for custom parameters, the program supports saving templates, which can be directly selected under mode selection next time.
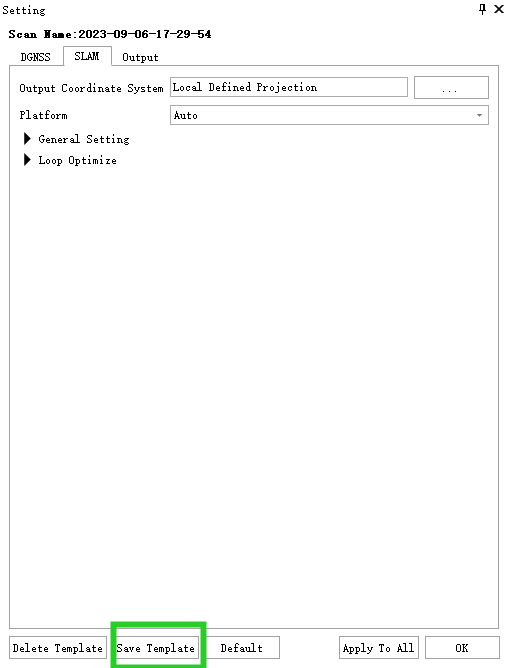
SLAM settings
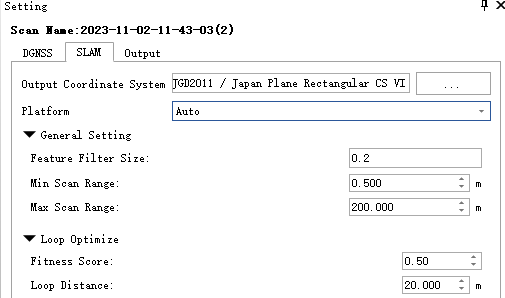
Output coordinate system
Automatically read RTK coordinate system, or the coordinate system defined by user when creating a new project.
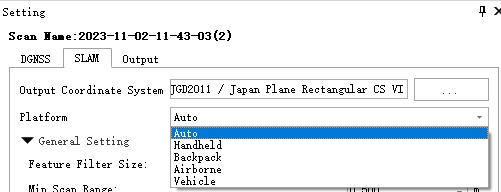
Platform
The default is 'Automatic'. Since the GreenValley APP requires setting the collection mode during data acquisition (the collection mode defines the relationship between the GNSS and the sensor's lever arm values), if set incorrectly, it can be modified here.
General Settings
Main Configuration Parameters for SLAM process.
Feature Filter Size
Default is 0.2, suitable for most scenarios. In some scenarios with weak features, such as underground pipelines or tunnels, it can be set to 0.1 or 0.05. The smaller the feature filter size, the slower the SLAM process.
Min Scan Range
The minimum scan range per frame for the LiDAR involved in SLAM processing, default is 0.5. For example: if there are always people or obstacles within 2 meters during data collection, this value can be set to 2 meters.
Max Scan Range
The maximum scan range per frame of the LiDAR involved in SLAM processing is 200 by default. For example: If there is little LiDAR data within 200 meters in certain scenarios, such as CAR scenarios, you can set this distance larger to match effective features.
Dynamic Object Remove
Check this option to remove moving objects during scanning.
Note: Stationary vehicles waiting for traffic lights and large amounts of traffic cannot be removed by this method
Loop optimization
The main configuration parameters during close-loop optimization.
Fitness score
Default 0.5 (input range 0-1). The explanation of the fitness score is somewhat complex. It can be understood as the probability that after scanning a certain distance and returning to a previously scanned scene, it is the same scene.
The default 0.5 adapts to most scenarios and generally does not need to be changed. Additionally, the current program supports manual editing of the close-loop, so this parameter is not frequently used.
Loop distance
Search the range of the same scene (close-loop distance) and perform close-loop judgment (related to fitness score).
The default score of 20 adapts to most scenes, generally does not need to be changed, and the current program supports manual close-loop editing, so this parameter is not frequently used.
Output settings
Each built-in processing mode has default output settings, which generally do not need to be changed.
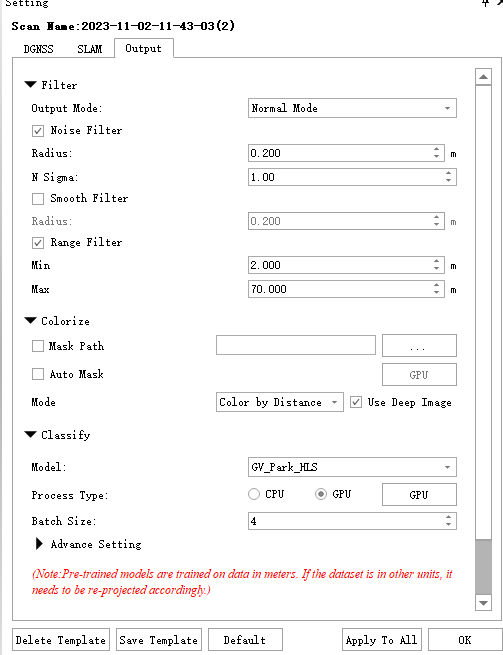
Output Mode
Divided into normal mode , high-density mode,high-density mode(2mm). High-density mode will output the point cloud with high density to enhance the display effect of the point cloud.

The left image shows the normal mode output, the middle shows the high-density output mode, and the right image shows the 2mm high-density output mode. Generally speaking, the point cloud density of high-density mode and high-density mode (2mm) output mode is 4-10 times more than that of the normal mode. Please pay attention to the disk consumption;

Note: The 2mm mode is only available for devices created through *.lislam; 2mm mode for O1-LITE devices are currently not supported
Noise filter
Checked by default, after checking, set the multiple of the standard deviation. If it exceeds the set multiple of the standard deviation, it is considered as noise and denoising is performed; Generally, the smaller the setting, the better the denoising effect, but if set too small, it may over-denoise, causing point cloud anomalies.
Smooth filter
Checked by default, mainly used for thinning the point cloud. If the set value is too large, it may cause terrain deformation or point cloud anomalies.
Carrier filter
Carrier filtering is a method of filtering the point cloud of the collector or carrier by forming a cylindrical range centered on the laser.
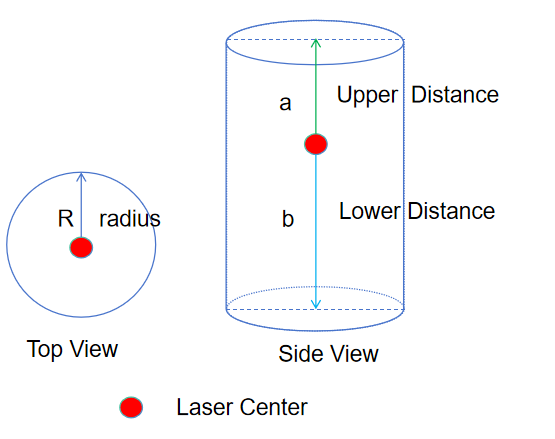
Radius : The radius of a cylinder
Upper distance : Remove the point cloud range above the laser
Lower distance : Remove the point cloud range below the laser
Distance filter
Maximum output distance :Set the maximum distance for data output, which means that the data range retained by each frame of point cloud must be within this threshold
Colorize
Perform colorization processing on the point cloud.
Mask path
The program will generally automatically read the built-in MASK file (located in the program installation directory \res\mask), and there is no need to select it separately.
If you encounter special scenarios, such as CAR, you need to create a MASK file separately and then select the created MASK.
Auto Mask
Experimental feature, can automatically exclude parts of handheld devices and the main subject.
Mode
Two colorization modes, automatically determined based on the selected SLAM processing mode.
Color by Time
Forestry default time colorization.
Color by Distance
General, Indoor, Tunnel, Default Distance Colorization.
Use depth image
Default checked, enhances display effect of the point cloud.
Optimize Sky-coloured Points
Can optimize the color of the tree crown.
Classify
Can automatically classify point clouds, such as extracting ground points, building points, power line points, moving objects, etc.
This module requires MLS platform license. Please contact sales or technical support for activation.
Mode
Select the *HLS mode for the SLAM device. The objects classified in different modes are not the same. You can view detailed information about classified objects in 'Classify Mapping' under 'Advanced Settings'.

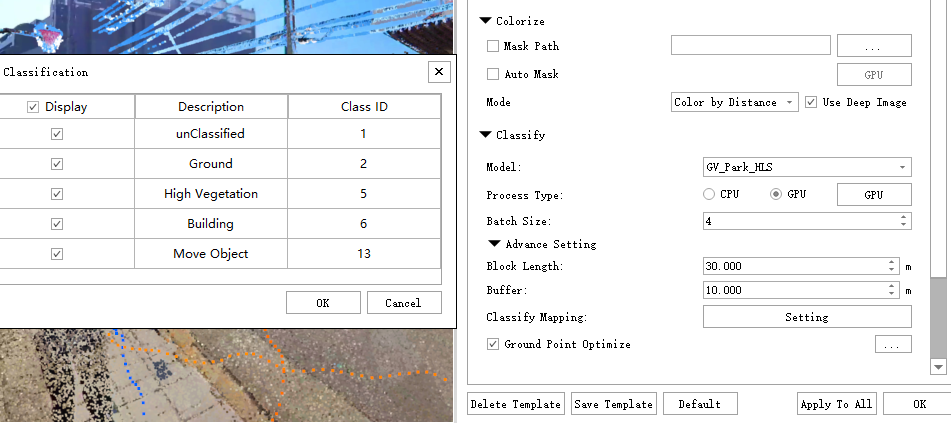
Processing Type
GPU or CPU, generally choose GPU. Refer to the hardware requirements for MLS installation.
Refer to the MLS manual for batch size and other settings.
Merge
Merge point cloud or not.

Note: The merged point cloud will not be displayed in the project tree
Mesh
Format that can generate Mesh models, default OSGB
