Create a Project from a Template
Steps
1.Configure the Template:
1.1 After launching the software, start by creating a project using the New Project button and configure it according to the guide.
1.2 Once the project has been successfully created and you've entered the software interface, click the Layer Configuration feature in the bottom left corner.
1.3 In the pop-up Layer Configuration dialog, configure template layers, fields, and enumerated values. The specific operations are as follows:
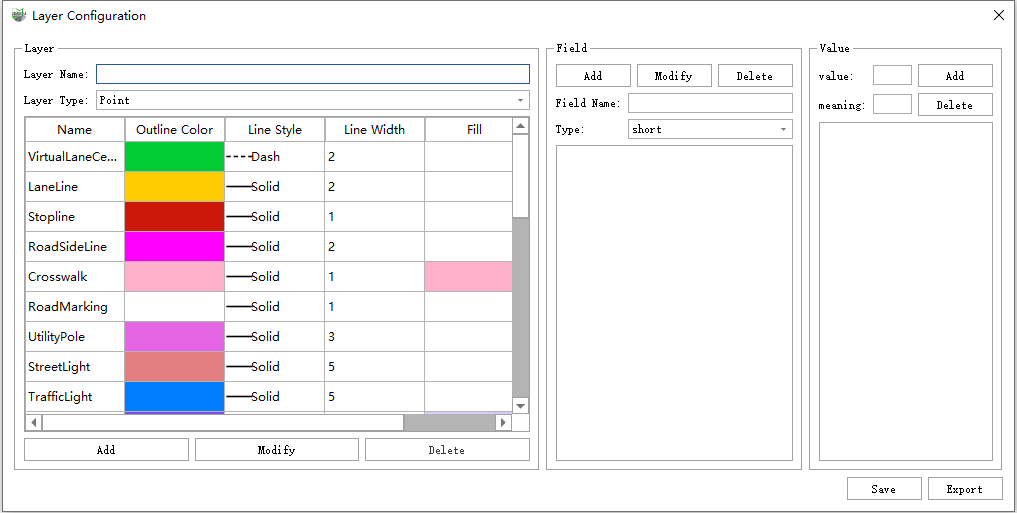
Layer configuration interface
(1)Parameter Settings:
- Layer: The Layer tab allows you to modify the name of built-in layers, and add/modify/delete custom layers.
- Field: The Field tab allows you to add attribute fields to the selected layer in the left-side layer tab and set the type of field values.
- Value: The Value tab allows you to set values for added fields and annotate the meaning of the current value.
- Save: Save the configured layer as a template, making it convenient to create new projects based on this template in the future.
- Export: Export the configured layer, making it convenient to directly import in the future or create new projects based on this template.
(2)Operation Instructions:
(2.1)Layer Tab Settings: In the Layer tab, left-click on the layer name in the list to modify and delete the currently selected layer and also add custom layers.
After selecting the target layer, you can set fields and field values in the Field and Value tabs respectively.
Add Layer: Input the name of the layer to be created in the "Layer Name" input box, select the layer type from the "Layer Type" dropdown menu, and click Add to complete the addition. The added layer will subsequently be displayed as a custom layer in the directory tree. After adding the layer, you can set fields and field values (see the later section on Modify Fields & Modify Values).
Modify Layer: Left-click to select the layer, input the modified name in the "Layer Name" input box, select the modified layer type from the "Layer Type" dropdown menu, and click Modify to complete the layer modification. To modify color, line type, line width, fill color, etc., double-click the corresponding cell.
Note:
- Built-in layers cannot have their layer type modified.
- Only polygon layers can set fill color.
- Delete Layer: Left-click to select the layer, then click Delete to delete the selected custom layer.
Note:
- Built-in layers cannot be deleted.
(2.2)Field Tab Settings: After selecting the layer to be configured in the Layer tab, you can set fields within the selected layer in the Field tab, including adding, modifying, and deleting fields.
Note:
- Built-in layer fields cannot be deleted or modified; only new fields can be added.
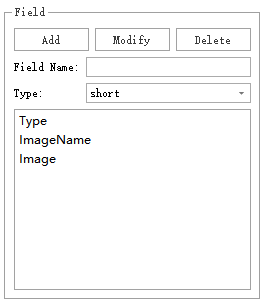
Field tab
Parameter Instructions
- Add: Select the layer in the Layer tab where you want to add fields, enter the field name in the "Field Name" input box, set the field type in the "Type" dropdown menu, and click Add.
Note:
- Field name and type are required to add a field.
- For text types, fill in the length; for float types, set the width (controls the number of decimal places displayed in the attribute table).
- Modify: Select the layer in the Layer tab where you want to modify fields, then select the target field in the field list, make changes to the field name, type, length, or width, and click Modify.
Note:
- This modification applies to the field's own properties (e.g., field name). To modify field values, refer to the Field Value Settings section.
- Built-in layer fields are not modifiable.
- Delete: Select the layer in the Layer tab where you want to delete fields, then select the target field in the field list and click Delete.
Note:
- The Delete button is disabled for built-in layer fields, as they cannot be deleted.
- Field Name: The name of the field.
- Type: An attribute of the field, indicating its storage type. Options include:
- short: Integer type with a small value range.
- long: Integer type with a large value range.
- float: Decimal type with lower precision, not suitable for high-precision data (e.g., coordinates).
- double: Decimal type with high precision, ideal for storing coordinate data.
- text: Text storage type.
- date: Date storage type.
- Binary: Binary sequence storage type.
(2.3)Field Value Settings: After selecting the layer and field, you can set the field value and its corresponding interpretation in the Value tab to configure field value enumerations.
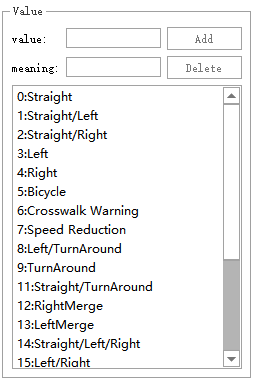
Value tab
Parameter Instructions
- Value: The value of the selected field.
- Meaning: The interpretation of the selected field value.
- Add: Enter a number in the "Value" text box, enter the meaning of the number in the "Meaning" text box below, then click the Add button on the right.
Note:
Enumerated values can also be configured for Text fields.
For Integer fields, both the value and its meaning must be set before adding. For Text fields, the meaning is optional. Once enumerated values are configured, users can set corresponding field attributes via the attribute table or feature property panel using these meanings when creating a new project from the template. For integer fields, the system automatically stores the associated value in the database.
The Add button is disabled if no field is selected in the Field tab.
- Delete: Select a row in the list below, then click Delete to remove the corresponding value.
(3)Save: Click the Save button in the lower right corner, select the save path in the pop-up browser dialog, and click OK to save the current configuration template.
- To create a new project from the saved template, go to File > New From Template, click Browse, and select the template file saved earlier. The saved template will appear in the "Recent Templates" list for quick access in subsequent use.
2.New From Template:
Once the template is set and saved, go to the File menu, select New From Template, click the required template, and configure point cloud, trajectory, and image data for the new project according to the guide. For specific configurations, refer to the [New Project] operation.
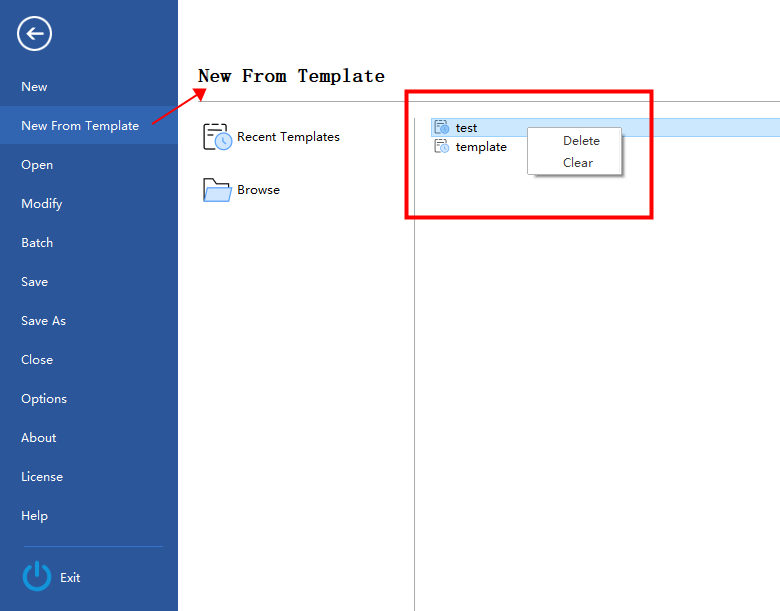
Create a Project from a Template
Parameter Description:
Delete: Delete the selected template.
Clear: Clear all current templates.
Clear all current templates
The most recently used templates are listed on the right side of the vertical line. Double-click a template name to proceed to the subsequent project creation process.
Browse
Click the button, then select the template file location in the pop-up file browser dialog to start creating a project from the selected template.
Selected templates are automatically added to the "Recent Templates" list for future use.