Place Tile Array
Function Description: Used for dividing a point cloud area into tiles, obtaining rectangular tile results, which serve as input for "Orthophoto Generation From Image".
Steps
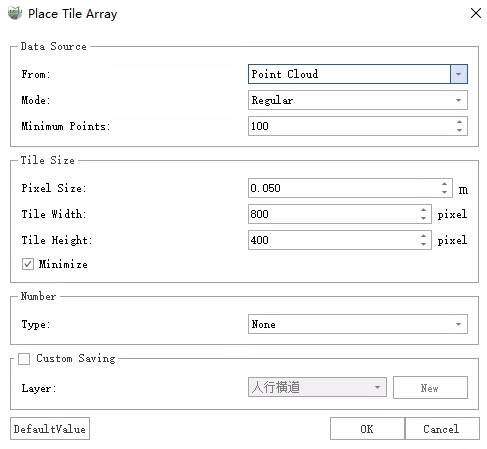
1.Click on the Road Analysis >> Orthophoto >> Place Tile Array button in the toolbox. The function dialog box is as follows:

Place Tile Array
2.After setting the data source, tile size, numbering, and other parameters, click OK to run the tiling process.
Parameters
Supports taking point clouds or vector lines (usually road centerlines) as input, dividing the target range determined by the data and parameters into tiles, and saving the tiling results as rectangular polygons.
Data Source: Set the input data and mode involved in the tile generation process.
From: There are two modes: point cloud and vector line (usually the centerline of roads). If Point Cloud is selected, all point clouds in the project will be divided into tiles. If Road Line is selected, users will need to manually select road vector lines in the 3D view.
Mode: There are three modes: Regular, Fill X, and Fill Y.
Regular: All tile blocks will maintain the set height and width.
Fill X: Only effective when Road Line is selected as the From. The set height is used as the tile height, and the data range in the X direction is used as the tile width.
Fill Y: Only effective when Road Line is selected as the From. The set width is used as the tile width, and the data range in the Y direction is used as the tile height.
Minimum Points: Only effective when Point Cloud is selected as the From. If the number of points within a certain tile area is less than this value, that tile will be deleted.
Left Width: Only effective when Road Line is selected as the From. With the selected road line as the center, this value is used as the width to the left of the forward direction to control the tiling area.
Right Width: Only effective when Road Line is selected as the From. With the selected road line as the center, this value is used as the width to the right of the forward direction to control the tiling area.
Tile Size: Used to determine the size of individual tiles and the scaling strategy.
Pixel Size: The actual physical size represented by a single pixel.
Tile Width: The width of a single tile, which is only valid when Regular or Fill Y is selected in the Mode.
Tile Height: The width of a single tile, which is only valid when Regular or Fill X is selected in the Mode.
Minimize: If checked, the program will scale the tile dimensions based on the effective data range within the tile.
Number: Number the tiling results.
Type: There are three modes: None, Left to Right/Top to Down, and Along Element. None indicates that numbering will not be performed. Left to Right/Top to Bottom indicates that numbering will be done from left to right and from top to bottom. Along Element indicates that numbering will start from the beginning of the vector line and proceed in the direction of the vector line, which is only available when Road Line is selected as the From.
Prefix: Only available when None is not selected in the Type. The numbering result will be in the format "Prefix + Number".
Start Number: Only available when None is not selected in the Type. The numbering starts from the Start Number and increments by 1 in sequence. The numbering result will be in the format "Prefix + Number".
Custom Saving: If checked, it is possible to save to an existing polygon layer in the project. If not checked, by default, it will be saved in the "Tile" layer.