Road Vector
Road vectors include: lane lines (all solid line segments, which need to be combined with the Merge to Lane function to generate complete solid and dashed lane lines), ground arrows, crosswalks, crosswalk warnings, yield signs, and other ground-related vectors.
Strongly Recommended: Before using this function, perform point cloud classification and only select the category containing ground points as the input category to effectively improve processing efficiency and detection accuracy.
Interactive(Built-in)
Steps
1.Click the Road Vector ![]() button.
button.
2.A Parameter Settings Dialog will pop up, select the Interactive(Built-in).
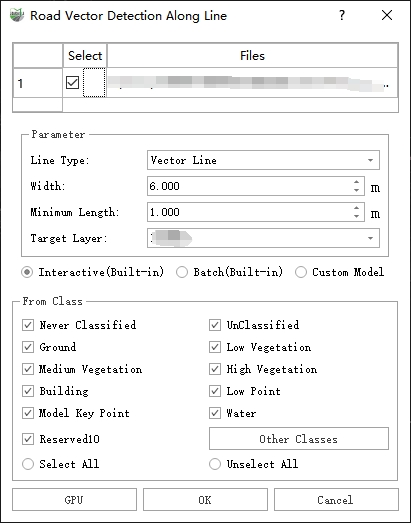
Road Vector Detection Along Line
Parameter Description
Selection: Check/uncheck the point cloud data that needs to be processed.
Parameters:
Line Type: This function requires determining a reference line, and this parameter is used to specify how the reference line is obtained.
- Vector Line: Click on an existing vector line to use as the reference line.
- Custom Line: Manually create a vector line to serve as the reference line.
- Trajectory: Select a segment of trajectory to act as the reference line, recommended.
The Trajectory option will only appear if there is trajectory data available within the current project.
Width: Used in conjunction with the line type to form a polygonal area centered on the reference line, extending left and right by the specified width, within which road vector detection will occur.
Minimum Length: Lines (lane lines) that are too short often represent erroneous extractions; lane lines shorter than the minimum length will be filtered out.
Target Layer: Specify the layer where the lane line results will be stored.
Source Category: Set the point cloud category to be used for detection.
If the current point cloud data has not been classified, only the "Create Points, Unclassified" option will be available;
Strongly Recommended: Before using this function, perform point cloud classification and only select the category containing ground points as the input category, which can effectively improve processing efficiency and detection accuracy.
Mode: CPU, Mode: GPU: Set the operating mode, with options for CPU or GPU. Running in GPU mode can provide a certain improvement in processing efficiency.
The GPU mode requires support from both hardware and software environments; if conditions do not meet these requirements, it will still run in CPU mode even if checked.
Confirm: After setting the appropriate parameters, click the confirm button to start the automatic detection.
Cancel: Cancel and exit the function.
3.Reference Line Setting and Area Polygon Generation
Vector Line Mode: Left-click to select an existing vector line, automatically generating a polygonal area based on the width; you can adjust the width to modify the area polygon.
Custom Line Mode: Sequentially left-click to add a vector line; double-click to finish creating the vector line, automatically generating a polygonal area based on the width; you can adjust the width to modify the area polygon.
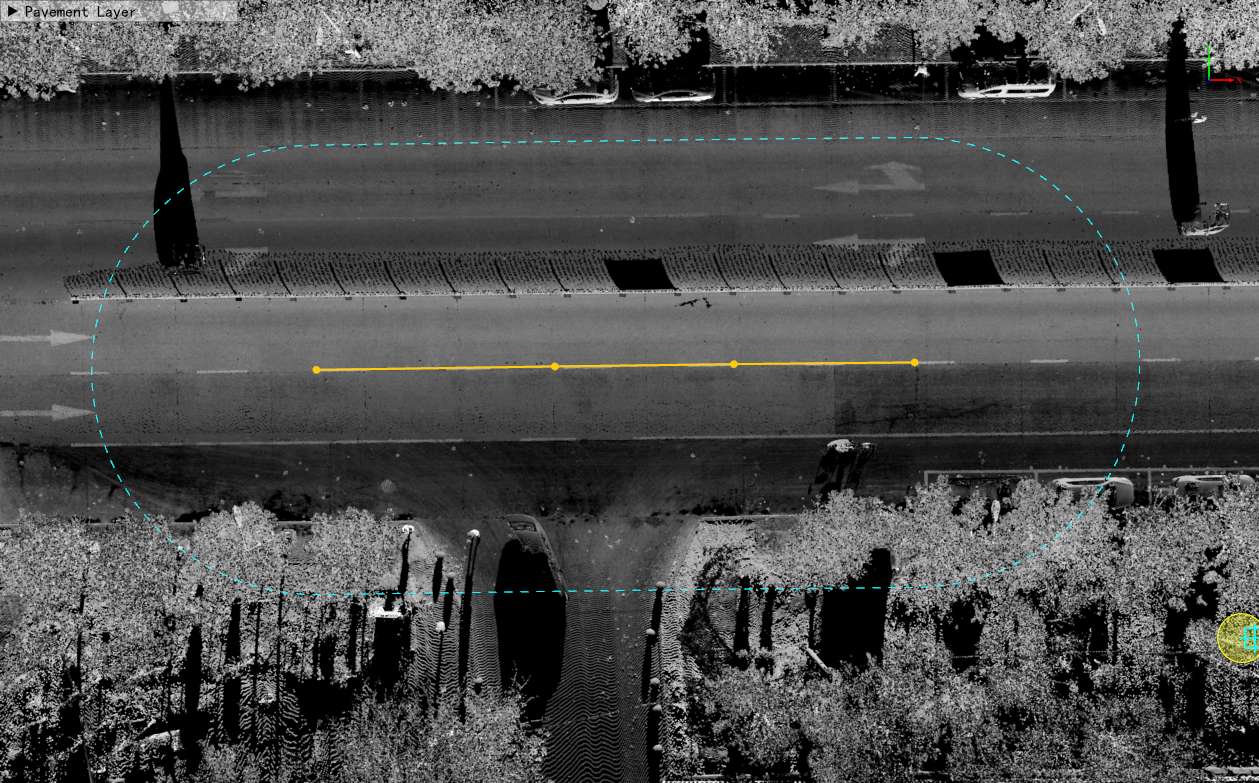
Polygon Areas in Vector Line Mode and Custom Line Mode
- Trajectory Mode, Recommended Usage
First, left-click to select the starting point of the trajectory segment, and then left-click to select the endpoint. An area polygon will be automatically generated based on the specified width, and the width can be adjusted to modify the area polygon.
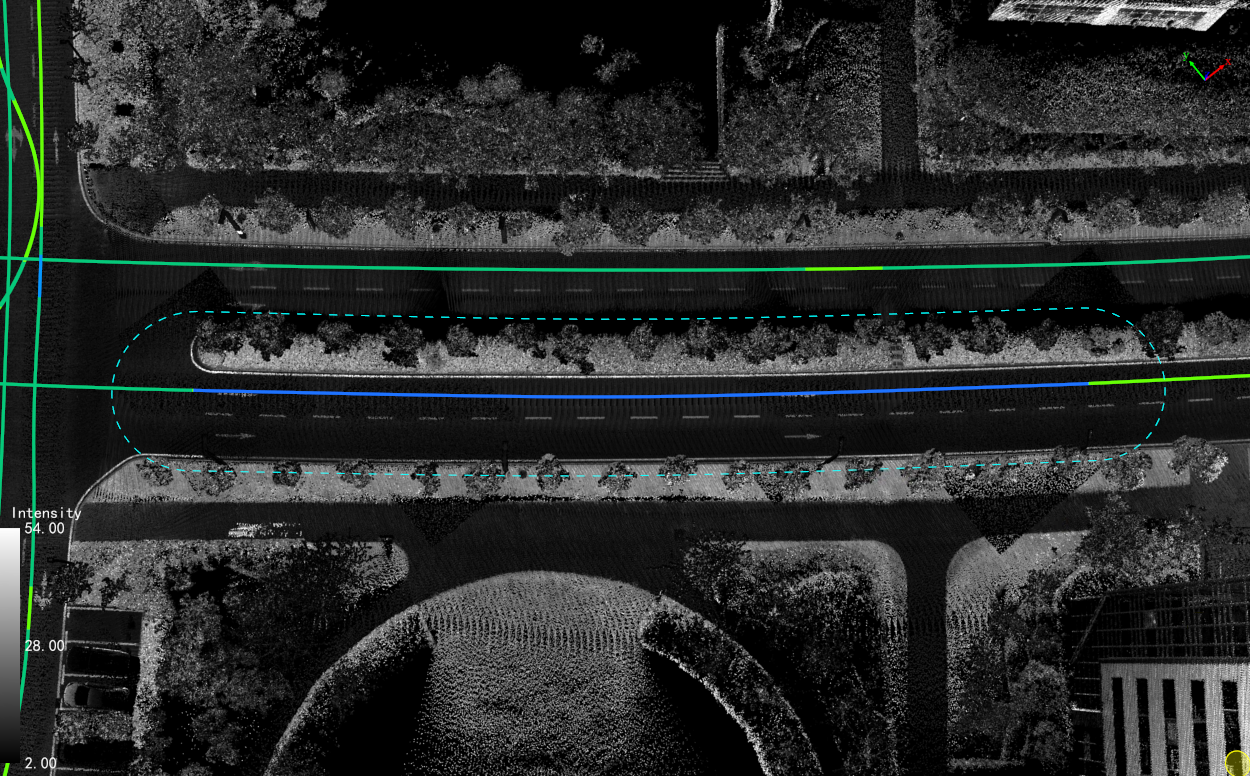
Trajectory Mode Area Polygon
4.Click OK to begin automatically identifying the road surface markings and vectorizing them. Pedestrian crossing markings will be stored in the built-in pedestrian crossing layer of the software, lane markings will be placed in the layer defined by the Target Layer, and other markings will be stored in the built-in road surface markings.
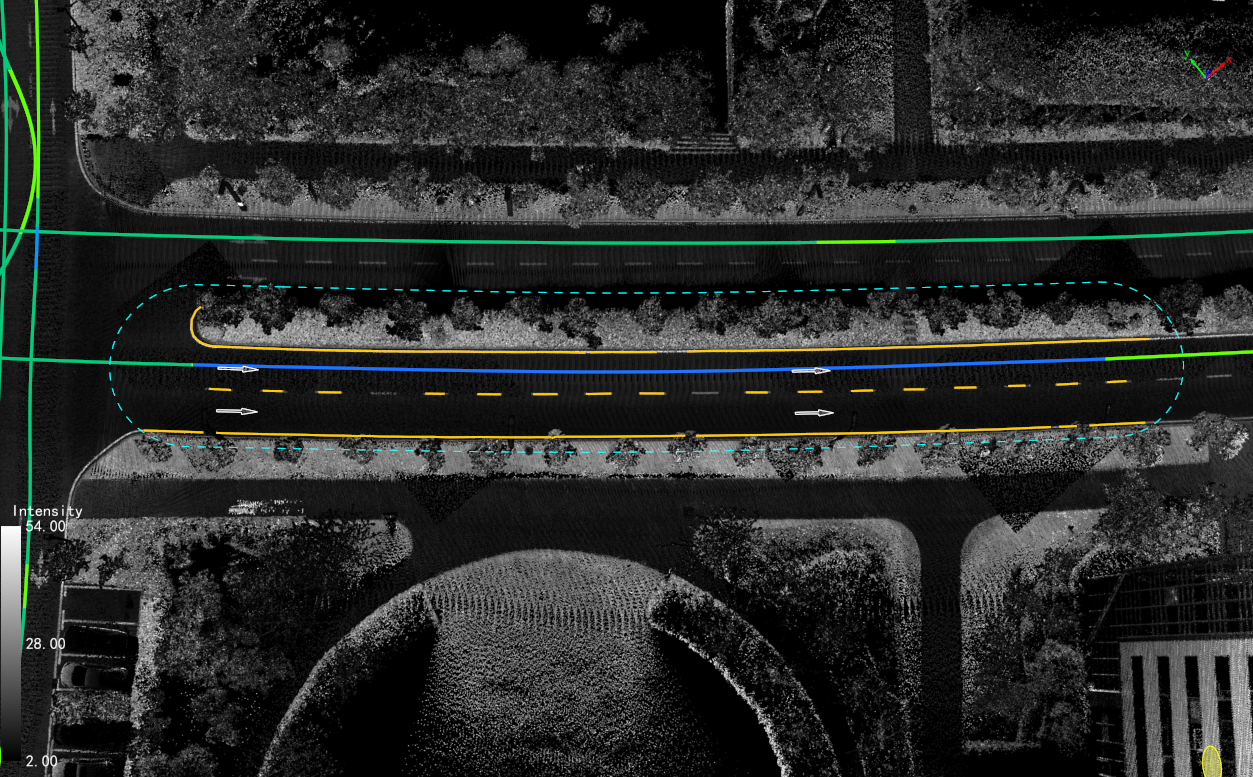
Result Display
In the result image, all lane markings are solid lines. You need to use the Merge To Lane function to generate complete solid and dashed lane lines.
Custom Model
Strongly Recommended: Before using the road vectorization function, classify the point cloud and only select the category containing ground points as the input category to effectively improve processing efficiency and detection accuracy.
Steps
1.Click the Road Vector ![]() button.
2.A Parameter Settings Dialog Box will pop up; select Custom Model.
button.
2.A Parameter Settings Dialog Box will pop up; select Custom Model.
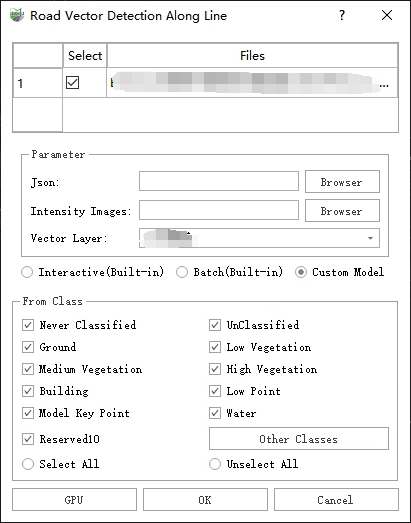
Custom Mode
Parameter Description
- Intensity Map: The location of the intensity map corresponding to the JSON file.
- Generation of Intensity Map: Toolbox - Map Features - Generate Intensity Map. Use the Generate Intensity Map function to automatically segment the point cloud and generate intensity maps. For details, refer to Generate Intensity Map.
- JSON: Select the location of the JSON file.
- JSON Generation: Raster Image - Detect or Segment Targets Using Training Model. Choose the corresponding intensity map to generate the JSON.
The intensity map and JSON files must be generated sequentially according to the above steps: generating the intensity map followed by generating the JSON. Only then can they be used for this function.
- Vector Layer: The layer where the result vectors are saved.
Since this is a custom mode and not an internal file, it cannot correspond directly to specific semantic information internally; therefore, all results will be stored in a single polygon layer.
3.Click OK to initiate automatic recognition of road surface markings and vectorize them automatically. All results will be stored in the selected polygon layer and saved as types in fields.
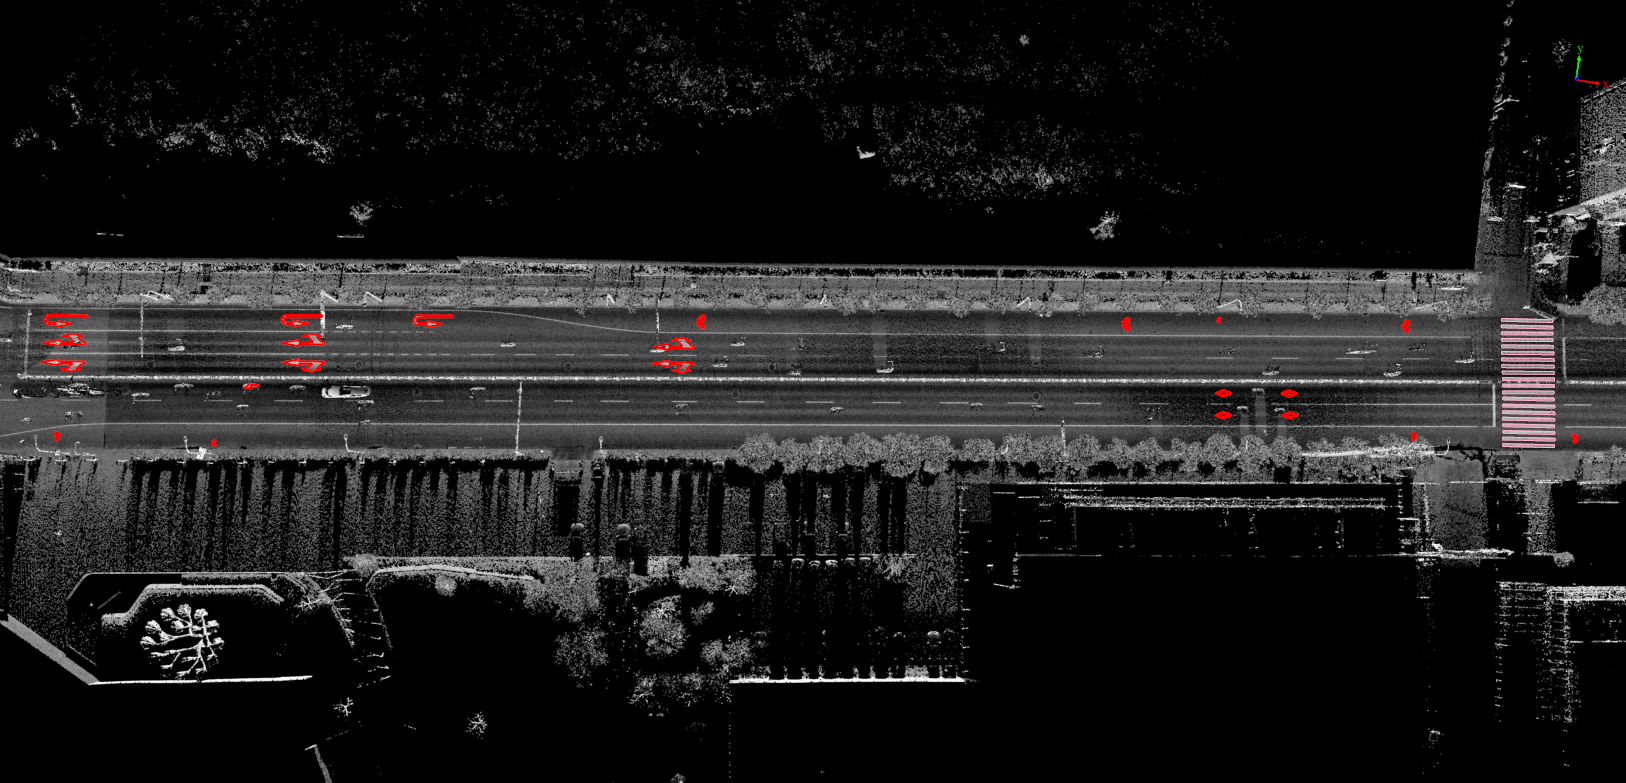
Result
Batch(Built-in)
Strongly Recommended: Before using the ground marking batch processing, classify the point cloud and only select the category containing ground points as the input category to effectively improve processing efficiency and detection accuracy.
Steps
1.Click the Road Vector ![]() button.
2.A Parameter Settings Dialog Box will pop up; select Batch(Built-in).
button.
2.A Parameter Settings Dialog Box will pop up; select Batch(Built-in).
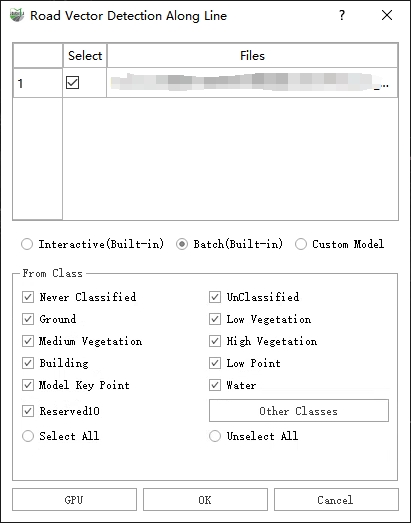
Ground Marking Batch Processing
3.Click OK to start automatic recognition of road surface markings and vectorize them automatically. Pedestrian crossing markings will be stored in the built-in pedestrian crossing layer of the software, while other markings will be stored in the built-in road surface markings.

Result