3D Mapping
Step
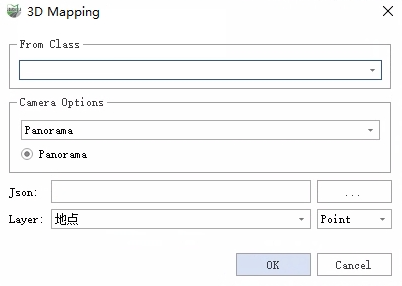
1.Click 3D Mapping![]() function. The interface settings are as follows.
function. The interface settings are as follows.

2.Complete the settings, click OK, and do the 3D mapping.
3.The mapping results are stored in the set layer.
Parameter Settings
From Class: Sets the categories of points that participate in the mapping. For example, if the Image Map data is a Pole detection result, select the point cloud category where Pole is located.
Camera Options: Select the camera to which the image belongs, and only one camera data is supported for each mapping. For example, if the Image Map data is a panoramic photo, then select "Panorama" here, and if the Image Map data is Camera No. 1 in a planar camera, select "Planar" in the drop-down box, and then click Camera No. 1 in the radio button.
Json: JSON is the format of the image detection result. Select the folder where the Json is located, and multiple Jsons can be stored in the file, and each Json represents the detection result of a photo. The JSON file name must be consistent with the corresponding image name.
Layer: This option indicates the location of the layer where the results are stored, and the mapping results support both Point and Polygon modes.
Point: Once the 3D mapping is complete, the center of the polygon is calculated as the final result.
Polygon: The original inspection shape is directly output.