Projection FAQ
1.[Error]: "Unable to open this project as it was made with a newer version of the LiDAR360MLS."
Cause: The project file was created in a higher version of the software, and the current software version is lower, which does not support opening it.
Solution: Use a higher version of the software to open it.
2.[Error]: "Failed to upgrade project file ..."
Cause: Upgrading the low-version project file failed, possibly due to damage to the project file or database.
Solution: Analyze the specific project file.
3.[Error[: "An exception was thrown while loading..."
Cause: Encoding error in the project file (LIMMP), default encoding is GBK. If other encodings were used to store Chinese characters, an exception will be thrown when reading the project file.
Solution: Use a third-party tool like Notepad to modify the file encoding.
4.[Error]: "Failed to load project file path from ..."
Cause: Similar to the above, encoding errors cause exceptions.
Solution: Use a third-party tool like Notepad to modify the file encoding.
5.[Error]: "Failed to save project file ..."
Cause: The project file (.LiMMP/.gpkg) has read-only permissions or is being used by another application.
Solution: Right-click on the .LiMMP and .gpkg files, check if the "Read-only" checkbox is selected; if it is, uncheck it and try again; if not, check if the project file is being used by another application; if so, close the application and try again.
6.[Error]: "Unable to change file permissions to writable..."
Cause: When opening the project, the system automatically upgrades the permissions of the read-only project file (.LiMMP/.gpkg) to writable. If the file is being used, the upgrade will fail.
Solution: Close the application using the project file.
7.[Error]: "Failed to open layer...|..."
- Cause: Failure to open the vector layer (followed by the corresponding layer name after "|"), two possibilities: one is that the gpkg file path has changed, making it unable to find the file; the other is that the corresponding table does not exist.
- Solution: For the first case, check if the gpkg path exists; if not, find the corresponding gpkg and place it in the correct path; for the second case, analyze the specific data.
8.[Error] "Failed to copy <InstallDir>/@default_en.gpkg to
Cause: When creating a new project, the software attempts to copy the default template file to the user-defined project folder but fails.
There are three possible reasons:
- The template file @default_zh.gpkg is missing from the
path. - The user-specified project directory
does not exist or the path is incorrect. - Insufficient remaining space on the target disk.
- The template file @default_zh.gpkg is missing from the
Solutions:
- For a missing template file: Ensure that the software has been correctly installed. If the issue persists, it is recommended to reinstall the software to restore any missing template files.
- For insufficient disk space: Free up disk space or choose another drive with sufficient space to save the new project.
- For insufficient disk space: Free up disk space or choose another drive with sufficient space to save the new project.
9.[Error] "No trjectory file, image file upgrade failed!"
- Cause: The version of the imglist file is low, and there is no corresponding trajectory file to support imglist upgrade.
- Solution: Import the corresponding trajectory file.
10.[Error]:"[Project Converter]Project file does not exist:xxx.ligeo"
- Cause: When opening a .ligeo project for automatic conversion to a .LiMMP project file, the project_file field in the corresponding .ligeo project file records the path of the .ligeo file, but the corresponding path does not exist. This usually occurs because the project file has been moved, but the path recorded in the project file has not been updated accordingly.
- Solutions: Manually edit the .ligeo file to ensure that the path recorded in the project_file field of the .ligeo file is completely consistent with the current path where the .ligeo file is located.
11.[Error]"[Project Upgrade]Unable to open table [xxx] , upgrade lane layer failed."
- Cause: When opening an old project database, the software attempts to automatically upgrade the geometry fields of the lane layer. If the layer fails to open, this error message will appear.
- Solution: Locate the original database file that contains the lane layer. If it cannot be found, and lane-related workflows are not required, the error can be temporarily ignored.
12.[Error]"[Update Database]GeoPackage file of the project does not exist:xxx.gpkg."
- Cause: When upgrading a lower-version project, the corresponding database file cannot be found.
- Solution: Locate the original database file and place it in the correct path as indicated in the error message.
13."Why does this dialog appear when opening an old project file, and what should I do?"
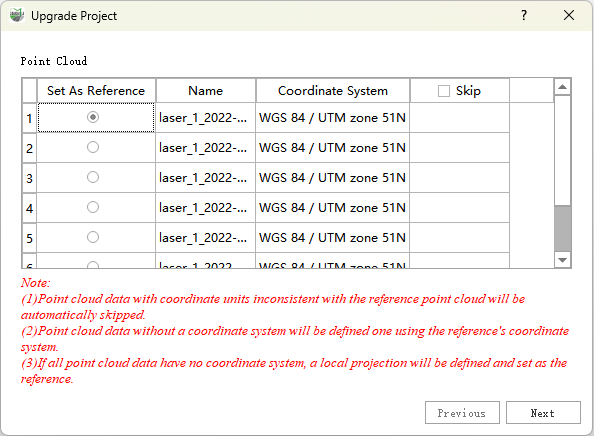
Reference Point Cloud Settings
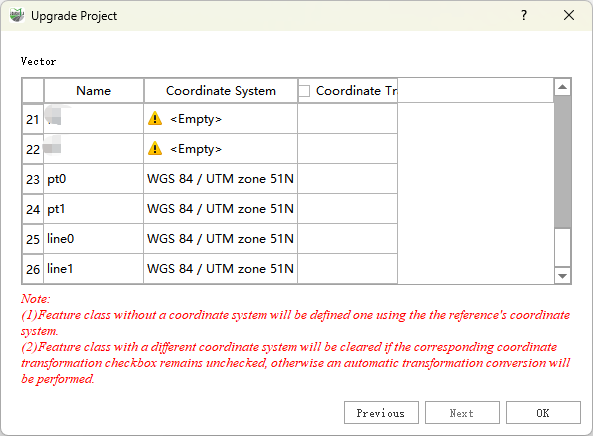
Vector Coordinate System Settings
Cause: In versions prior to 2.1.0, the software did not enforce a unified project coordinate system. As a result, a project might contain point clouds and vector data with different coordinate units, which could affect subsequent processing and analysis. Starting from later versions, the software introduces a coordinate system upgrade mechanism. Normally, the process runs automatically, but a dialog will appear in the following cases:
- Point clouds within the project have inconsistent coordinate units. The user must select one point cloud as the reference coordinate system. Other point clouds with mismatched units will not be loaded.
- The project contains vector layers with coordinate units inconsistent with the reference point cloud. To avoid accidental data loss, the system requires the user to decide whether to convert the vector layer to the reference system or to clear it.
Solution: On the first page of the dialog, select a point cloud as the reference coordinate system and click Next. On the second page, focus on vector layers marked with a yellow exclamation mark:
- Checked: Convert the vector layer to the reference point cloud’s coordinate system.
- Unchecked: Clear the vector layer.
For detailed instructions, please refer to Project Upgrade.