Other Tools
Clear Tree ID
Steps
1.Click on the Other Tools ![]() button and select Clear Tree ID
button and select Clear Tree ID ![]() . This will open the following dialog box:
. This will open the following dialog box:

Clear Tree ID
2.Set the point cloud file that you want to clear the Tree ID for, and click OK. Wait for the clearing process to complete.
Extract by Tree ID
Steps
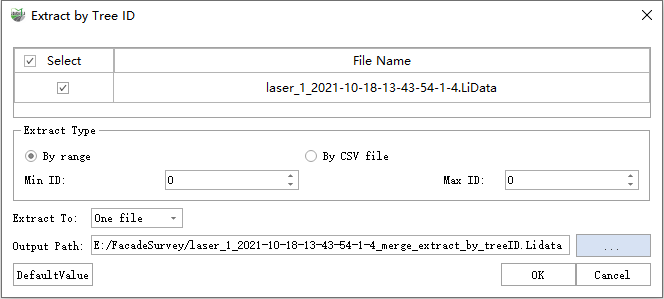
1.Click on the Other Tools ![]() button, and then click on Extract by Tree ID
button, and then click on Extract by Tree ID ![]() button to open the dialog box as shown below:
button to open the dialog box as shown below:

Empty Tree ID
2.Set the point cloud file that needs to be extracted;
3.Set the extraction type. There are two ways:
All: Extract point clouds of all tree IDs in the file.
By range: Set the minimum and maximum target tree ID.
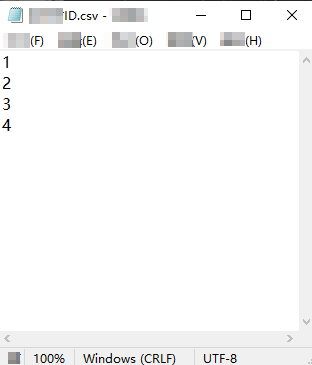
By CSV File: Edit all target tree IDs in the CSV file and import it into the function. The specific file format is as follows:

Tree ID CSV File Format
4.Set the output type. There are two ways:
One file: All points are exported to one point cloud file.
Multi files: The target tree ID points of each file are exported to their respective point cloud result files.
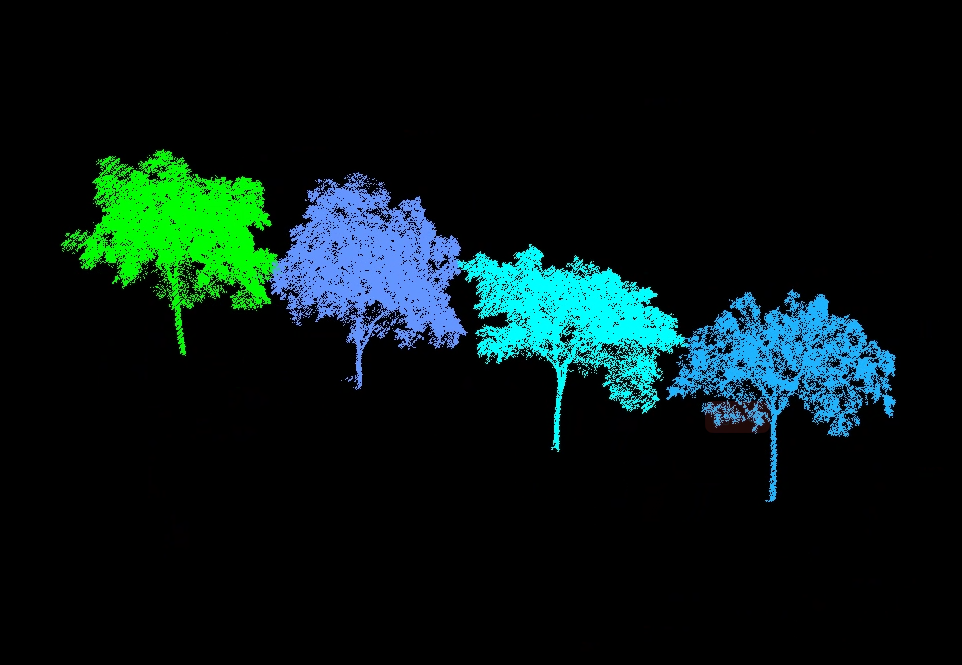
5.Set the output file or folder, and click OK. The export result is as follows.

Extraction Result
Add Point Cloud Attributes by Table
Steps
1.Click Add Point Cloud Attributes by Table ![]() butto. "The pop-up window is as follows.
butto. "The pop-up window is as follows.

Add Point Cloud Attributes by Table
2.Check the fields that need to be added, and click OK to add them.
Parameter Settings
Fields: Selected fields will be added to the additional attributes, and those not selected will not be added. The specific supported field types and additional rules are as follows.
Additional rules: Since additional attributes do not support strings, rules are adopted according to different field types.
"Non-text type": For short integer, long integer, float, and double types, the added attribute names, types, values, and field properties remain consistent after addition.
Text type: For text type, the name of the added attribute is the field name plus "ID", the type is short integer, and the value starts from 1. In addition. A new field (field name plus "ID") will be added in the "Tree" layer, which is consistent with the additional attribute.
Fields Additional Attributes Type Name Value Type Name Value Short Integer Name Value Short Integer Name Value Long Integer Name Value Long Integer Name Value Float Name Value Float Name Value Double Name Value Double Name Value Text Name Value Short Integer NameID 1...(Starting from 1.) Additional rules
Import Seed Points
Setps
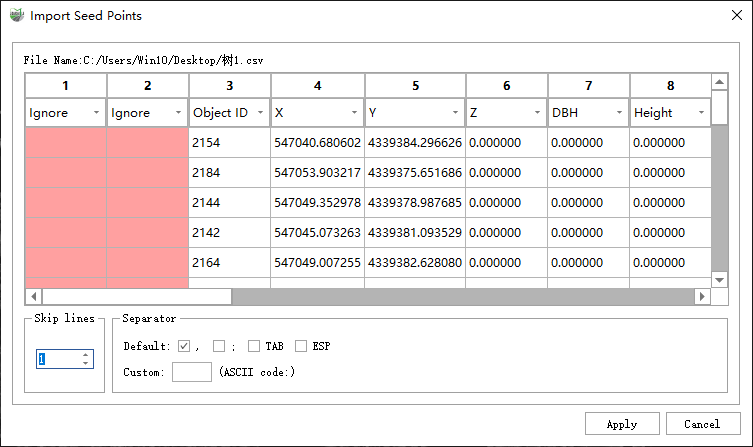
1.Click Import Seed Points![]() , then select the seed point file.
, then select the seed point file.
2.Set the delimiter, specify the Object ID, X, Y, Z, DBH, Height field data. After setting the number of lines to skip, click Apply to complete the import of seed points.

Import Seed Points
Parameter Settings
"Import logic": Importing seed points involves the following three situations.
Not Existed: If the imported seed points do not exist in the 'Tree' layer, then create new seed points.
Existed: If the import seed point already exists in the Tree layer, the position and DBH and Height values are updated.
Invalid: If the import seed point "Object ID" is invalid (less than or equal to 0), the program automatically creates a valid Object ID before importing.
Statistical Clearance Points
Steps
1.First, run the Segmentation ![]() function in this module to complete the segmentation of individual trees, obtaining the segmented point clouds and seed for individual trees.
function in this module to complete the segmentation of individual trees, obtaining the segmented point clouds and seed for individual trees.
2.Run Clearance Analysis ![]() , and perform clearance analysis on the point clouds of individual trees.
, and perform clearance analysis on the point clouds of individual trees.
3.Click on Statistical Clearance Points ![]() , and after the operation is completed, the statistical results will be written into the "ClearanceID" field of the tree layer. For example, if there are clearance clusters with "ClearanceID" values of 1, 2, and 3 within a single tree 1, then the "ClearanceID" field will be written as "1|2|3".
, and after the operation is completed, the statistical results will be written into the "ClearanceID" field of the tree layer. For example, if there are clearance clusters with "ClearanceID" values of 1, 2, and 3 within a single tree 1, then the "ClearanceID" field will be written as "1|2|3".