Editor
Control the start and end of vector editing, supporting the editing of one vector object at a time. Editable vector objects include: selecting a vector file for editing, creating a temporary vector file, and creating and editing a new file.
Select Vector File
Click Editor > Select Vector File
If there is vector object data in the editing window, a dialog box for selecting vector object data will pop up, listing the vector object data already loaded into the editing window. Select the data you want to edit.
If there is no vector object data in the editing window, a dialog box for selecting vector object data will pop up to load data from the disk for editing.
Once editing is enabled, other functions on the vector editing toolbar will be activated.
During editing, the vector data being edited cannot be removed from the editing window.
Create Temporary Scratch Vector
Click Editor > New Sketch Editing
A temporary editing canvas is constructed in the editing window, allowing for vector editing. The edited vector data is loaded into the directory tree as a temporary object in the window.
Once editing is enabled, other functions on the vector editing toolbar will be activated.
During editing, the vector data being edited cannot be removed from the editing window.
New Vector File Edit
Click Editor > New Vector File Edit
A file selection dialog box will pop up, generating the corresponding vector data file based on the user's selected path (supporting DXF and SHP formats, KML format is temporarily not supported; KML files can be converted to SHP format for editing using a conversion tool) and loading the vector data file into the editing window to enable editing.
Once editing is enabled, other functions on the vector editing toolbar will be activated.
During editing, the vector data being edited cannot be removed from the editing window.
Export LabelMe
Click Editor > Export LabelMe
Save the vector results automatically extracted from the image as a LabelMe format file in the same folder as the image for custom deep learning model training.
Save
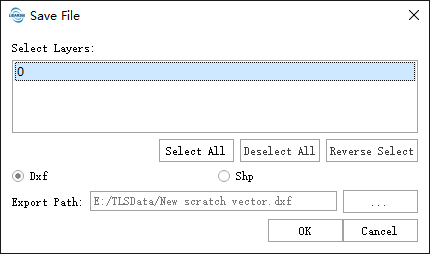
Description: Click *Editor > Save*. If it is a sketch and has not been saved before, the file save dialog box will pop up. Otherwise, it will be saved to the original file.

Select the layer, file type, and save path, and click "OK" to save the layer to the specified path.
Note:
- If the saved file has a .shp suffix, a corresponding directory named directoryname_layername_points.shp or directoryname_layername_lines.shp will be created.
End Editing
Click Editor > End Edit
Ending the current editing session will prompt a dialog box to save the editing results. The user can choose as needed, exit the editing function, and the vector editing module will become unavailable.