Installation
Download the latest version of LiDAR360 Suite from the GreenValley International official website before installation.
System Requirements
- RAM: at least 32 GB or more.
- Central Processing Unit (CPU): Intel® Core™ i5/i7; Dual-core processor.
- Display adapter: NVIDIA graphics above GTX 970, video memory no less than 4GB.
- Operating system: Microsoft Windows 7 (64-bit), Microsoft Windows 8 (64-bit), Microsoft Windows 10 (64-bit), Microsoft Windows 11 (64-bit), Microsoft Windows Server 2012 and higher.
Note: To ensure optimal software performance and stability, we recommend using Windows 10 or a later operating system. On certain specific configurations of Windows 7, full compatibility cannot be guaranteed, and operational issues may occur.
Note: Please enable high-performance graphics mode for running the software.
Note: For "use shaders to render the point cloud color strategy","Mesh Editor", "Building Model Display", etc. you will need a display adapter that supports at least 4.6 OpenGL and glsl versions and at least 4GB of video memory.
Setup
- Run the LiDAR360 Suite Setup Wizard.
- Click "Next" button in the Welcome Interface.
- Click "I Agree" button to continue if you accept the License Agreement.
- Choose the installation path (or use default path), then click "Install" button.
- Click "Finish" button after installation.
License Manager
There are two licensing approaches to activate LiDAR360, by license dongle or license code. A hard lock license provides a USB flash drive, and a soft lock license provides an authorization code. For license dongle, users must not format, delete, or copy the license dongle.
1) License dongle
Properly insert a license dongle to USB port to activate LiDAR360.
2) License code
License code would be generated based on activation information given by LiDAR360 users. After purchasing a license code, please follow the following steps to activate LiDAR360.
1.Run the software LiDAR360.
2.Click File > Activate License, the License Manager window will pop up.
3.Fill in your name and company name, select the modules you want to activate, and then click “Copy”.
4.Email the copied information to info@greenvalleyintl.com.
5.There are two licensing modes: single use licensing and concurrent use licensing.
Single Use Licensing
Activation/Update
Online activation/update: When connecting to the Internet, under the “Single Use Licensing” tab, enter the authorization key, select “Online”, and click “Activate” to activate or update, or you can select the authorization code in the Key list, right-click the right mouse button, and choose “Activate key” from the displayed menu. Under “General Information” page, you may also check the expiration date for each individual module. If you need to set up proxy to connect to the Internet, click
 to use proxy and to set up the address, port, user name, and password.
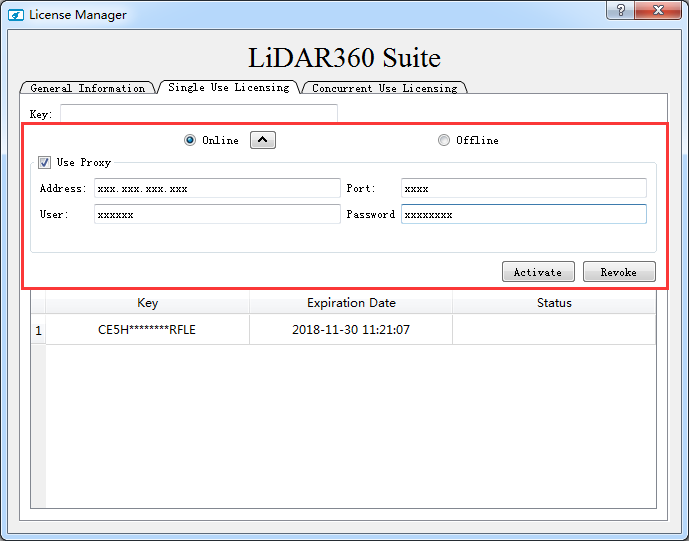
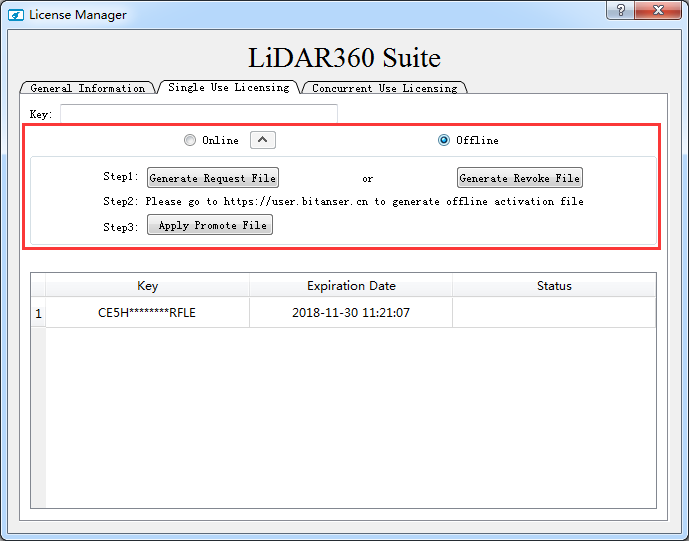
Offline activation/Update: Enter the authorization code, select Offline, click “Generate Request File” button to generate the request file (.req). Use a computer that can connect to the Internet to browse to http://user-us-west.bitanswer-cloud.com/, enter the authorization key to log in, click “Offline Update”, upload the request file (.req), and download the generated upgrade file (.upd). On the license management interface, click “Apply License File”.
Revoke
To unbind an activation key from a computer, user could revoke the activation key online or offline. After the authorization key is revoked, it can be reused on the same computer or a different one.
Online Revoke: In “Single Use Licensing” tab, enter the authorization key, select “Online”, and click “Revoke” to revoke the key. If you need to set up proxy to connect to the Internet, click
to use proxy and to set up the address, port, user name, and password.
Offline Revoke: Enter the authorization code, select “Offline”, click “Generate Revoke File” button to generate the revoke request file (.req). Use a computer that can connect to the Internet to browse to https: //user.bitanswer.cn, enter the authorization key to log in, click “Update Offline”, upload the request file (.req), and download the generated upgrade file (.upd); On the license management interface, click “Apply License File”.
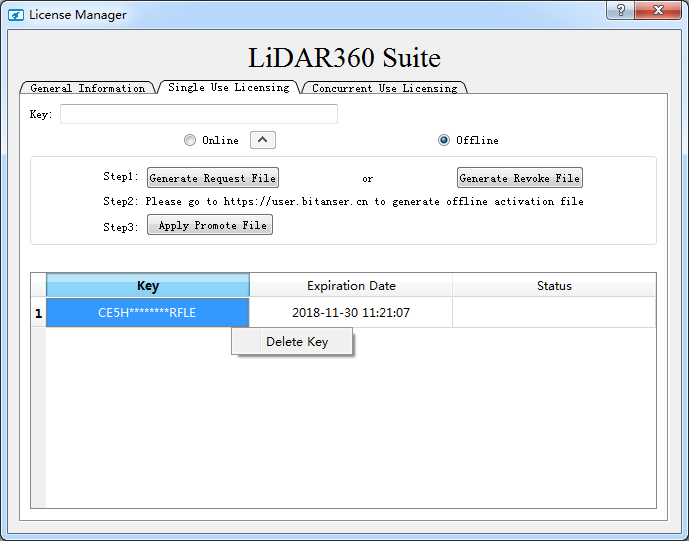
Delete
To delete authorization information from the computer, right-click on the authorization key and select “Delete Key”. After being deleted, the same activation key can only be used on the same computer.
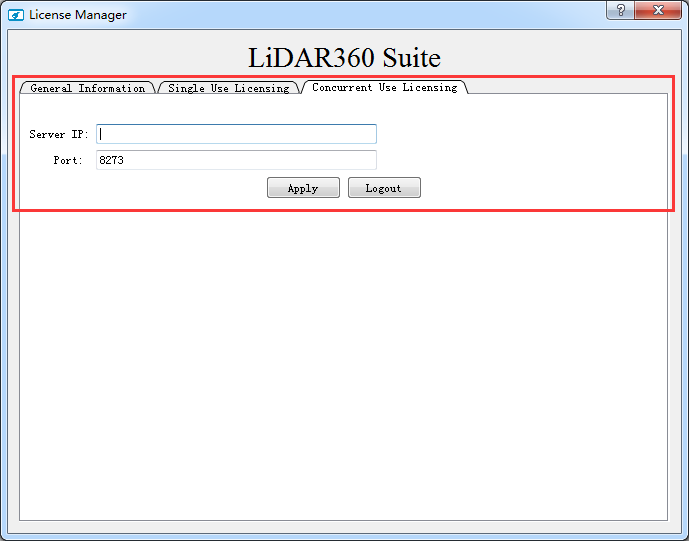
Concurrent Use Licensing
Install the Group authorization service tool on the group server on the LAN and add the Group service extension module. Activate the authorization code online or offline in the Group authorization management center. Other users on the LAN enter the server IP address on the license activation page. The default port number is 8273. Click Apply.
6.Click the ![]() button on the top right corner of License Manager interface to view the license manager user guide.
button on the top right corner of License Manager interface to view the license manager user guide.
Note: If any of the software instance is being opened while updating the license, please restart the software.
Note: If an user would like to move a key from one computer to another, he/she should revoke first, then activate on the other. If the license code has been deleted, the user should reactivate on the same computer first, then revoke and activate this key on the other computer.
Note: Please contact info@lidar360.com to make an inquiry and purchase a license key to activate LiDAR360.
Languages
Currently, the supported languages are English, Chinese, French, and Japanese. The user can change the menu language in the following way:
Click Ribbon Toolbar in the upper right and click Display Setting > Language > English/Chinese/French/Japanese* in the menu bar.
Click “Yes” in the pop-up to restart the software immediately, or click Cancel and restart later. If “Cancel” is selected, the software does not restart and will be displayed in the selected language the next time the software is started.
Use shaders to render the point cloud color strategy
Currently, the software provides the option of using shaders to render the color strategy of point cloud. Users can choose according to their needs. The selection steps are as follows:
Click Ribbon Toolbar in the upper right and click Display Setting > Rendering > Use shaders to render color strategy
Click “Yes”, you will be prompted whether to restart the software. You can complete the switch of the color strategy of the rendering point cloud if you restart. If “Cancel” is selected, the software does not restart and will be rendered with the preset color policy the next time the software is started.
"Use shaders to render color strategy" refers to that the same point cloud can be displayed in different Windows according to different color strategies, and the rendering adopts the programmable pipeline shader technology.