Individual Tree Editor
Functional Overview
Individual Tree Editor can extract and edit individual trees in large data points cloud, and can quickly locate and filter out user-concerned individual trees. It is mainly used to solve over-segmentation, under-segmentation and missing segmentation and other cases, and can also repair fine of under-story trunk.
Usage
Load the point cloud data needs to be edited in the window and make sure to activate that window.
Click TLS Forest > Individual Tree Editor or ALS Forest >Individual Tree Editor to activate the editing bar in current window. Some functions of different modules maybe different.
The buttons in the individual tree editor tool bar, from left to right, are: start/end editing, profile, open the individual tree attributes file, individual tree filter, settings and exit.
Please note that if there is no special need, you should normalize the point clouds which need to be edited. Please refer to Normalization. After editing is complete, the original point cloud can be restored by reverse denormalization. The profile window takes the plane with Z value of 0 as the datum, and for the normalized point cloud, the datum is the ground. For the unnormalized point cloud, the point cloud is far from the datum due to the influence of elevation, which may cause the point cloud and the cut polygon may not exist in the profile view. Therefore, normalized point cloud data can be better edited. In addition, functions such as removing support brackets and re-segmentation under this module need normalized point clouds to get correct results.

Start/End Editing
Click Edit > Start Editing
Select the data to be edited and click "OK" to render the point cloud as displayed by tree id. Other functions of the individual tree point cloud editing tool bar will become available.

The selected data cannot be removed from the window during editing. After editing, click "End Edit" to end the editing.
Profile
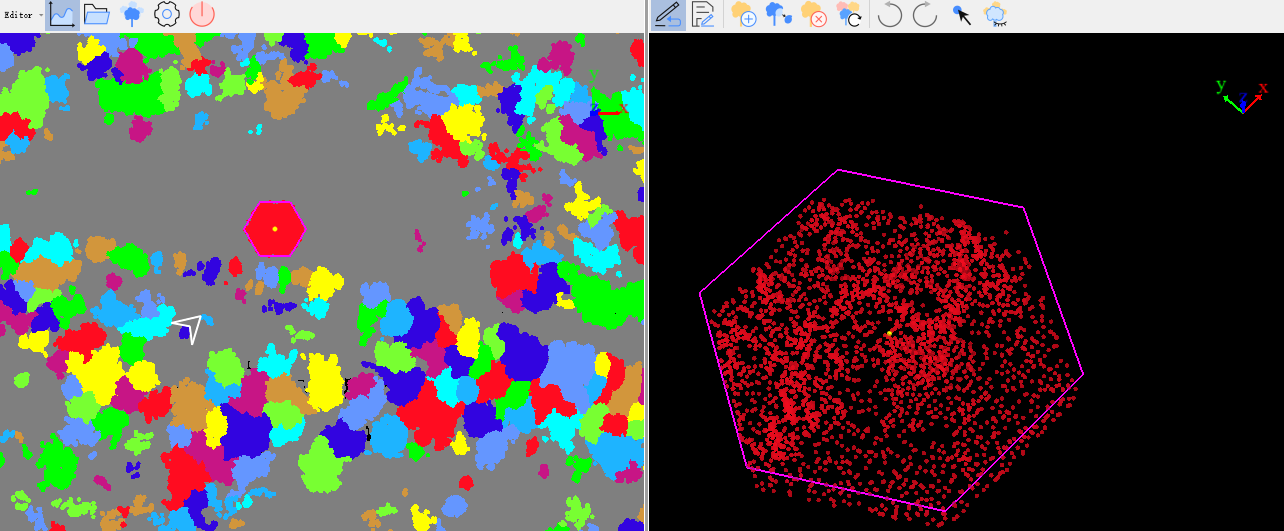
Functional Description: Click the "Profile" button to open the profile window and draw a hexagonal area in the window where the point cloud is located. This area is the individual tree point cloud area to be edited. The individual tree editor toolbar appears above the profile window.From left to right: Load/remove edit area, Save, Create individual tree, Merge individual tree, Delete individual tree, Re-segment/remove support bracket, Back up, Redo, Select point, Hide tree.
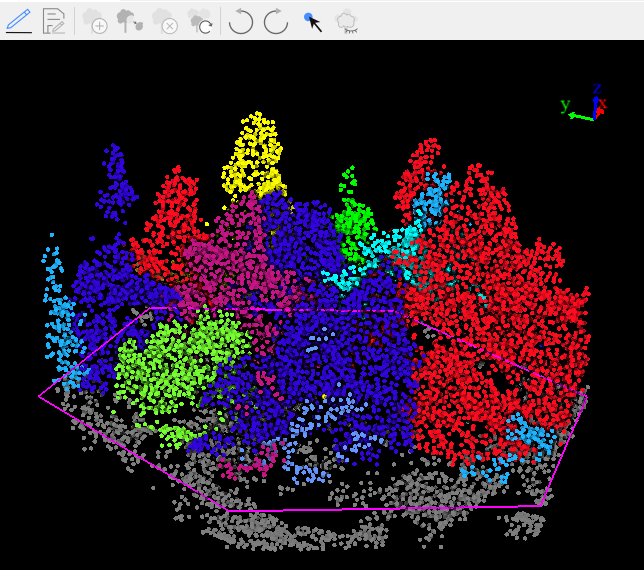
Note: 1. Please pay attention to the individual tree boundary when picking up the hexagonal area, because the incomplete part may affect the result, or try to avoid modifying the boundary when editing. None of the editing functions in this module will have an effect on hidden trees, so you can hide trees you don't want to edit to avoid affecting the results.
- Since version 5.0, the method of drawing the profile area is modified to: Click the left mouse button, drag, and release the mouse to complete the drawing of the profile area.
Open Individual Tree Attributes File
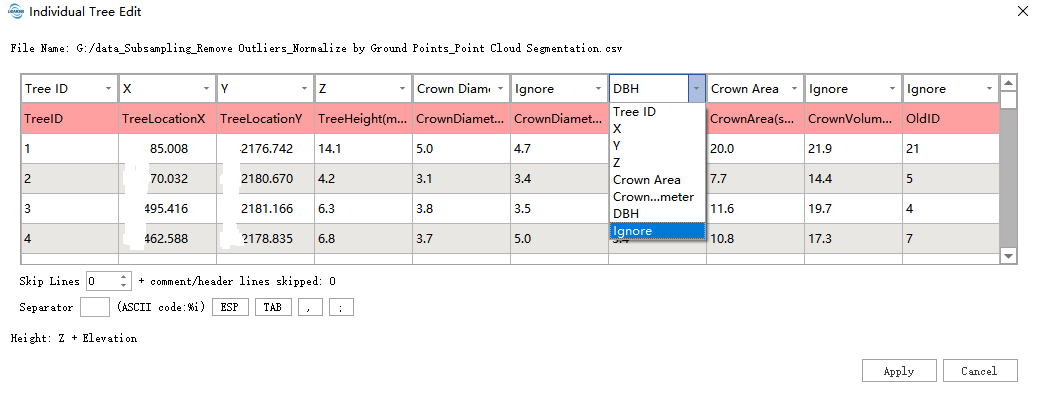
Functional Description: Individual tree attributes file is a CSV file generated after individual tree segmentation. Please note that this function recognizes and skips several rows of the table header by default. If necessary, it can be adjusted by itself. Before clicking apply, ensure that the table header field is consistent with the corresponding column in the CSV file.
Individual Tree Filter
Functional Description: Before performing individual tree filtering operations, open the individual tree attributes file. This function can be set according to the parameter range, quickly screen interested individual tree. When the filter is enabled, the editor's main window sets the filtered individual tree color in the scene to transparent, and the profile window automatically applies the filter to hide the corresponding individual tree in the edit area. Currently, there are two filtering modes. Trees that match the filtering range are kept display in display mode, while other trees will be hidden. In hidden mode, the effect is reversed.

Settings
Functional Description: This includes profile distance, auto save and other settings.

- Profile Distance: When drawing the profile, please observe the distance between the point and the display area in the profile window for the users to view the editing area or editing effect according to the distance conveniently. For example, for ALS forest, the section distance can be set to hundreds of meters. And for TLS Forest, it can be set to tens of meters.
- Auto Save: It is used to auto-save the edited area when switching the profile areas.
Load/Remove Editing Area
Functional Description: Click *Load Editing Area* button to set the area in the hexagon as the area to be edited. The data for editing the individual tree point cloud is the data in this area. All editing tools are available in the profile window. Enter the editing state at this time, selects the section area in the main window again, it will automatically choose the data in the selected area to be the new editing data.

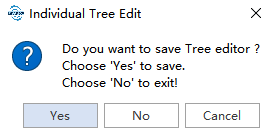
Click “Remove Editing Area” button, and this action will exit the editing directly if no operation is done to the point cloud file; Otherwise the system will prompt you whether to save the point cloud data. Choose yes to save the point cloud data to a file, and you can see that the large data point cloud in the main window has been modified. Or you can choose no to exit the individual tree point cloud that is being edited without saving the data.
Save
Functional Description: Click the "Save" button to save the modified individual tree point cloud data to the file. At the same time, you can see that the big data point cloud in the main window has been modified accordingly. Back up data if necessary, because it cannot be restored after being saved.
Create Tree
Functional Description: This function can effectively extract the selected point cloud and set it as the new tree ID. Click the "Create Tree" button and will appears the window shown as below. Select the category to create the tree point in the category drop-down list box, choose the category to participate in the point cloud segmentation from the filter point drop-down list box,select the whole category by default, select the scene job tool from the selection tool, select the polygon by default, then select the area in the profile window, double-click the end, you can see the color of the selected area changed, which means the tree is created. This function is often used in conjunction with other functions, such as creating a new tree ID for a point below a certain height and deleting it to remove the ground portion, or making an individual tree in a selection to be a new individual tree and segmenting it again.
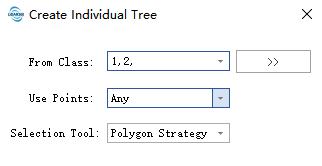
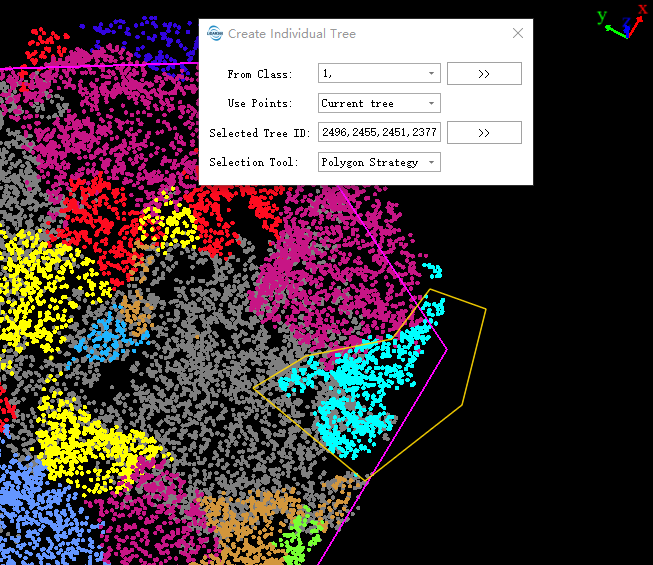
- From Class: Only specific classes of points are used to filter . Please note that the tree ID has nothing to do with the category, and it does not have to be classified as a tree to have a tree ID.
- Use Points: Only the points with specific tree IDs are used, avoiding making changes to other trees. There are three options:
- Any: Applicable to all visible points.
- Current Tree: Applicable only to the point cloud corresponding to the selected tree ID in the list. When selecting this option, pick the tree ID in the window to the input list by activating the pick tool. After picking, select "Pick seed point" to switch back to this function.
- No Tree ID: Applicable only to the point with tree ID of 0.
- Selection Tool: Select the points within the area by different selection tools.
Merge Tree
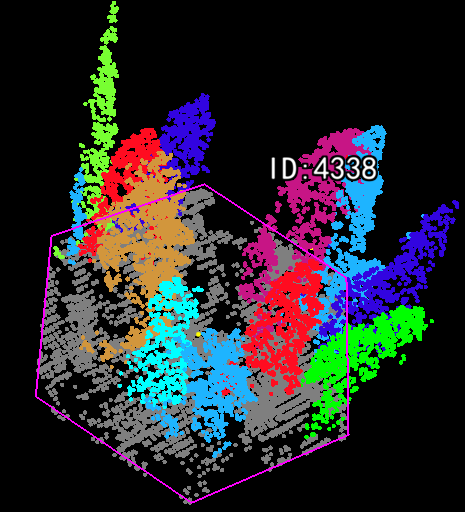
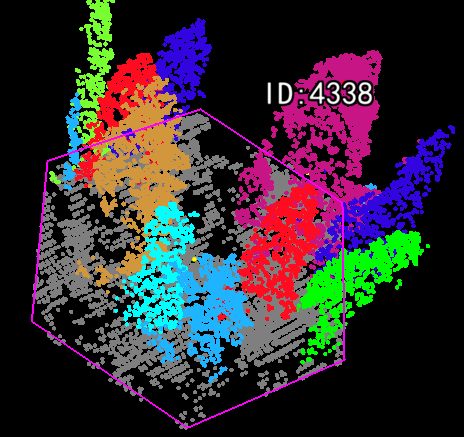
Functional Description: It is used to manually solve the over-segmentation problem. Click “Merge Tree” button, use the mouse to pick up tree in the profile window, if the picked tree ID is not 0, mark the tree ID at the mouse position.Then pick up other trees, and they will be combined into the first picked individual trees. You can see that in the profile window, the color of the picked trees will change to the color of the first picked individual trees, right-click the mouse to end the pickup.
Delete Tree
Functional Description: Click "Delete Tree" button and use mouse to pick up trees in the profile window. If the picked tree’s ID isn’t 0, you can mark it as 0 and delete the tree.
Remove Bracket
Functional Description: This function only exist in the individual tree editor of TLS Forest, and can remove the support brackets of the tree trunk by semi-automatic interaction. Click the left mouse button to select a point on the trunk below the branch point above the support bracket as the reference point, process the point cloud below the height of this point, and set the tree ID of the point cloud corresponding to the support bracket to 0. The principle of the algorithm is the trunk and branches grow at the same time according to the height, and remove the growing branches. Therefore, when the lowest height of the support bracket is the same as the lowest height of the trunk, the result will be better.
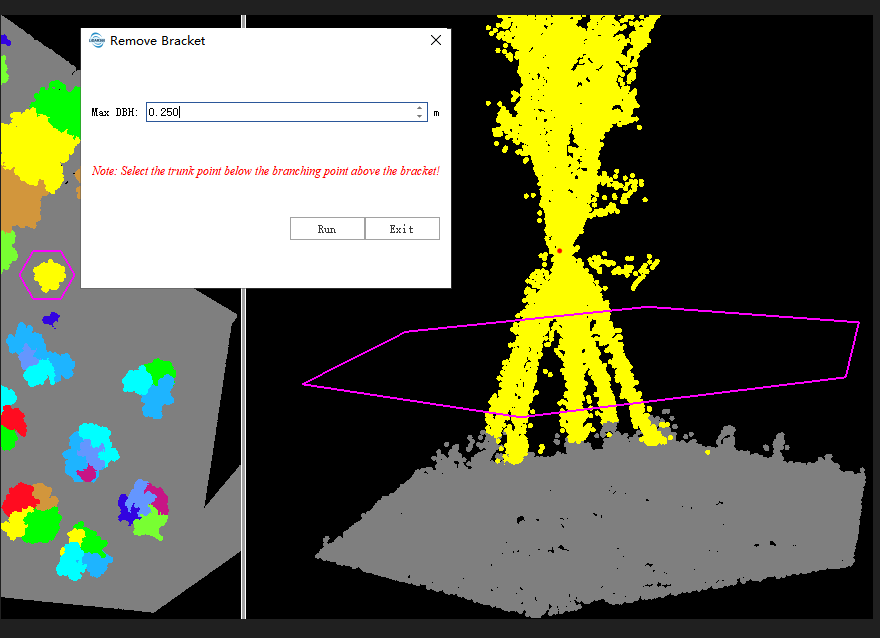
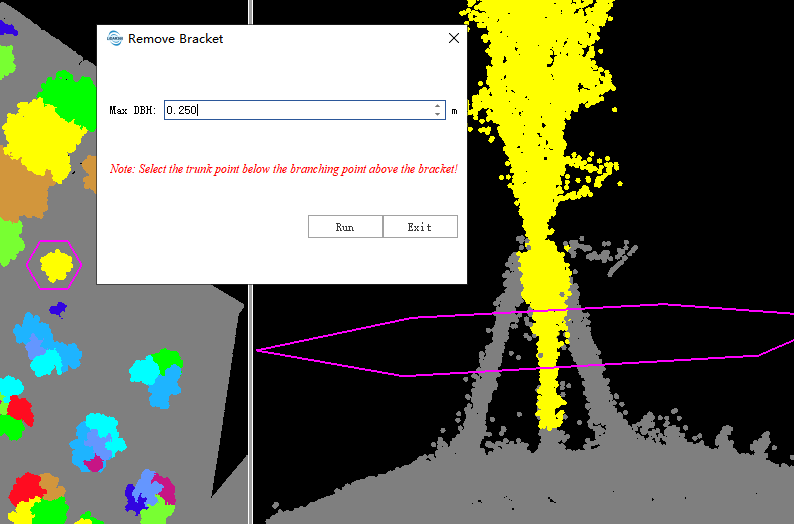
- Max DBH: Maximum DBH of the extracted trunk. Appropriate DBH settings can better extract the trunk. If the value is smaller, the extracted trunk will be finer, and if it is larger, more support bracket point clouds will be retained. When you open the individual tree attributes file and click the reference point, the DBH displayed on the input box will automatically update to a slightly larger DBH value for the corresponding tree in the file.
Re-segmentation
Functional Description: This function can only solve the problem of over-segmentation and under-segmentation of trees through semi-automatic interaction in the editing of the individual tree editor area under the ALS Forest. The algorithm process spatial search to the point clouds based on the seed points picked up in the view, and one seed point generates at most one individual tree. For over-segmentation, a point with obvious spatial characteristics (have a certain distance from other trees and easy to distinguish, generally the top of the tree) can be picked as the seed point, and a point closely related to this point in space will be classified as a new individual tree. For under-segmentation, multiple seed points need to be picked up and multiple single trees are generated by the same algorithm at each seed point position.
Click “Re-segmentation” button, and the function dialog box will pop up, click the left mouse button to pick up points as the seed points in the profile after setting the corresponding parameters, click "Run" to re-segment the point clouds in the editing area. The segmented tree IDs contain the biggest tree ID of the big data point cloud and the IDs above it, the tree segmented by this function will not be saved to the individual tree attributes file. Before using this function, you can hide the trees that don’t need to be divided, set the usage category and set of points to obtain higher precision segmentation effect.
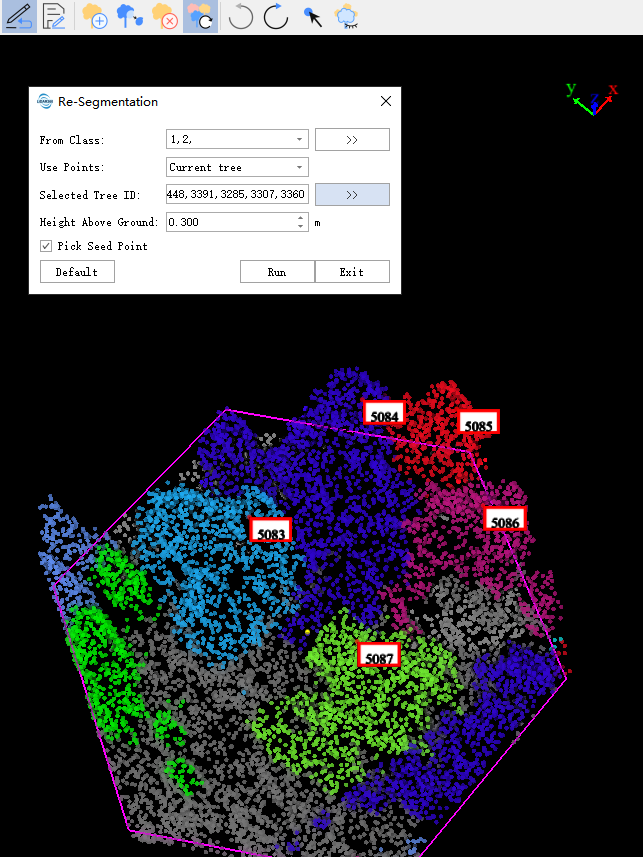
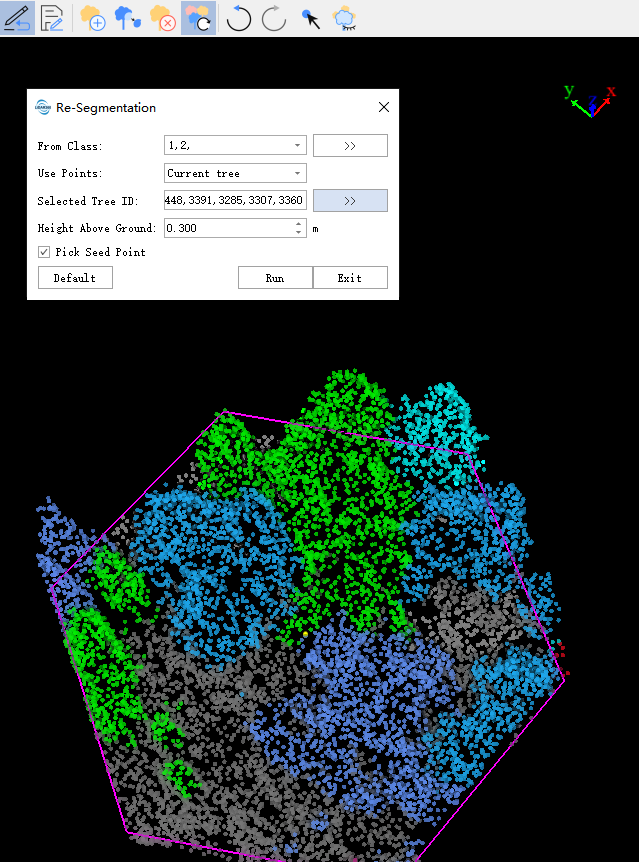
- From Class: Only specific classes of points are used to filter. Please note that the tree ID has nothing to do with the category, and it does not have to be classified as a tree to have a tree ID.
Use Points: Make targeted editing based on the point set of the selected tree ID. It is usually used for under-segmentation of an individual tree or under-segmentation of multiple individual trees. There are three options to use set of points:
- Any: Applicable to all visible points.
- No Tree ID: Applicable only to the point with tree ID of 0.
- Current Tree: Applicable only to the point cloud corresponding to the selected tree ID in the list. When selecting this option, pick the tree ID in the window to the input list by activating the pick tool. After picking, select "Pick seed point" to switch back to this function.
Minimum Height: Filter points below the minimum height to prevent dividing points on the ground. When the individual tree point cloud and the low grass bush on the ground are jagged and interleaved, the tree generated by the algorithm will grow downward and outward, resulting in segmentation errors. This phenomenon can be effectively avoided when the parameter is set above the height of the ground low grass bush.
- Pick Seed Point: You can pick up seed points under the checked state. If you switch to tools such as "Pick Point" and "Measurement", the check box will be automatically unchecked. At this time, you can use these tools without quitting the function. If you manually check it, you can switch back to the mode of picking seed points.
Undo
Functional Description: Click *Undo* button to undo the last option. The maximum times of undoing is 20. Any operation before the last 20 steps cannot be undone.
Redo
Functional Description: Click *Redo* button to redo the last option. The maximum times of undoing is 20. Any operation before the last 20 steps cannot be undone.
Pick Point
Functional Description: Click the "Pick Point" button and use the mouse to pick up the point cloud in the profile window. The attribute information of the point will be displayed.
Hide Tree
Functional Description: Click "Hide tree" button, use the mouse to pick up the point cloud in the profile window, and hide the tree with the corresponding tree ID of the point in the scene. The hidden tree can avoid being modified.
Exit
Functional Description: Click the "Exit" button to close the profile window and exit from individual tree editor directly if no editing operation has been done; Otherwise the system will prompt you whether to save the data. If you select Yes to save the data in the edit area to the file, you can see that the big data point cloud in the main window has been modified. Or you can select No to exit the editing area directly without saving the data. At the same time, close the profile window and exit from individual tree editor .
