Import POS
Function Overview
In the processing workflow, POS information can be used to accelerate image processing and determine the position of images in the real world.
Purpose
POS information serves three main purposes:
- POS information can be used in the image matching process for pair selection (georeferencing), increasing processing speed.
- Used in the alignment updating process.
- As a weighting factor, it participates in bundle adjustment optimization, enhancing the robustness of the processing results.
- When processing large-scale, high-resolution images, only considering image information for image alignment may sometimes not yield an optimal result (due to outliers caused by mismatches, unavoidable errors in image distortion parameter estimation, etc.). To improve the robustness of image alignment results, a strategy of joint adjustment of POS and image is used during the alignment process, making the setting of POS accuracy crucial.
- Note: When the external camera's internal parameter accuracy is insufficient or the original image quality is poor, the camera position in the image alignment results may deviate significantly from the corresponding GPS value. Adjusting the POS weight can significantly improve the image alignment results (e.g., adjusting the camera distance accuracy from the default 10 meters to 1 meter).
Usage

Click the "Import POS" button. First, select the project file to import the POS into from the dropdown list (only project files that have been added to the software can be selected). Then, based on the format of the POS to be imported, choose to import by filename or by time. Importing by filename means the POS file contains a column with the corresponding image names, which can be matched with each image. Importing by time uses the camera shutter time file (.cam) and trajectory file (.traj) to interpolate the trajectory and determine the camera's POS information.
Import by Filename

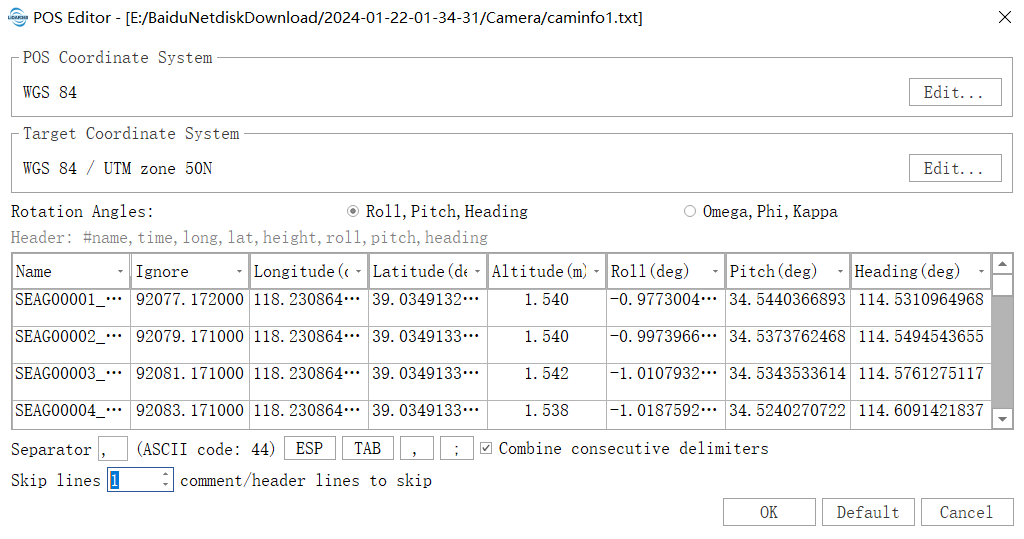
Select "Import by Filename," choose the POS file to import (supports TXT and CSV files), and click "Next." A dialog box will appear to set the POS format.
- Set POS Coordinate System and Target Coordinate System: Refer to the Coordinate System section.
- Separator Adjustment: If the file data is not displayed correctly in the table, adjust the separator (optional). If the POS file is not displayed effectively in the list after loading, adjust the separator at the bottom of the table to effectively separate and display the data. Currently, TAB, "\t", "\n", "," separators, and combinations of these separators are supported. By default, POS data will be separated using combined separators. If the file separator is not among the four types mentioned above, you can enter an appropriate separator in the separator text box to effectively divide the data.
- Rotation Angle Type (optional): Set the angle type based on the imported data. If you do not want to use angle information, set the column header for the angle column to "Ignore."
- Skip Invalid Rows (optional): Adjust to ignore the first N rows of the POS file. By default, no rows are skipped.
- Column Headers (required): If the column headers do not match the current column data, click the dropdown list of column headers to select the appropriate column header for the current column. If the selected POS coordinate system is a geographic coordinate system, column headers should select longitude, latitude, and altitude; if the selected POS coordinate system is a projected coordinate system, column headers should select Easting, Northing, and altitude.
After confirming that the POS information for each photo is set correctly, click "Confirm" to complete the import and save the POS information into the project file.
Import by Time

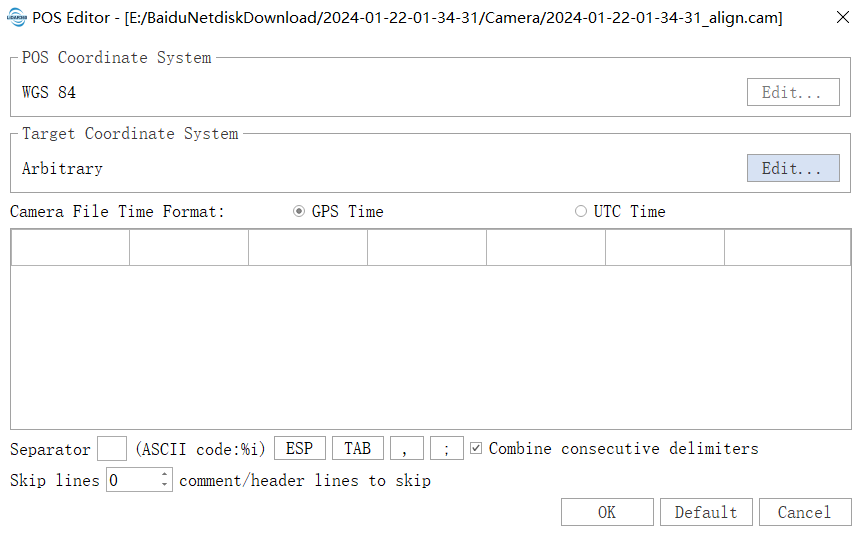
Select "Import by Image Time," choose the corresponding camera shutter time file (.cam) and trajectory file (.traj), and click "Next." A dialog box will appear to set the POS format. The first column is the file name column of the imported images, for easy correspondence with the camera shutter time file. The next six columns are the POS position and angle columns. After successfully interpolating the trajectory file by selecting the time column, the specific values will be displayed in these columns.
- Set POS Coordinate System and Target Coordinate System: Refer to the Coordinate System section.
- Separator Adjustment: The operation is the same as importing by filename.
- Skip Invalid Rows (optional): Adjust to ignore the first N rows of the camera shutter file. By default, no rows are skipped.
- Camera Time Type (required): Set the time type of the camera shutter time file, which is divided into GPS time and UTC time.
- Column Headers (required): The time column must be selected to obtain position and angle data by interpolation.
After confirming that the interpolated POS information for each photo is correct, click "Confirm" to complete the import and save the POS information into the project file.
Coordinate System
Two coordinate systems need to be set: the POS data coordinate system and the target coordinate system. The POS data coordinate system indicates the coordinate system in which the POS file was collected; the target coordinate system indicates the coordinate system used in subsequent processing steps and must be a projected coordinate system. After selecting the POS data coordinate system, the target coordinate system will automatically be recommended as the corresponding UTM projected coordinate system. To change the coordinate system, click "Edit," and in the popup dialog box, select "More" in the coordinate system dropdown list. Then, select the appropriate coordinate system in the subsequent dialog box.