Mark Distribution Network Tower
Summary
By managing towers according to distribution network lines, selecting tower positions through mouse interaction, selecting tower types, and saving them as JSON format files. After adding the position of the tower, the software will automatically generate default Index and Name information. The Index is incremented based on the starting value, and the Name is consistent with the Index by default. The tower types include "None Type", "Tension Tower" and "Straight Line Tower". Double click on the row where each tower record is located to jump to the corresponding tower location. Select to show/hide all branches or tower points of the selected branch through the "Show Branch" checkbox, and select to show/hide tower Connections through the "Show Tower Connections" checkbox, with adjustable point sizes. The keyboard shortcuts S and D can move the edited tower record forward and backward.
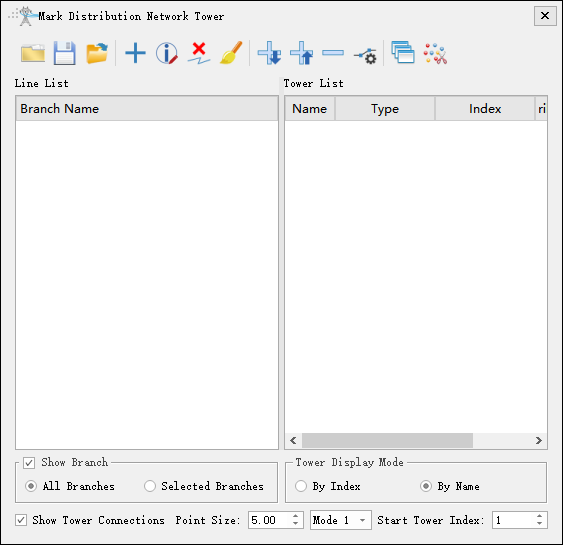
- Show Branch(by default selected): By default, all branches are selected and the tower name or tower index is displayed in the window view. Uncheck to hide the tower name or tower index.
- By Index: Display the tower index.
- By Name: Display the tower name.
- Show Tower Connections(by default selected): Show tower connections in the window view, uncheck to hide tower connections.
- Point Size(meters)(default value is "0.5"): Set the size of the red identification ball and text font for the tower.
- Show Mode: In the 3D view of Mode 1, the size of the tower annotation changes with the zoom of the view, while in the 3D view of Mode 2, the size of the tower annotation remains fixed and unchanged.
- Start Tower Index: The number of the first tower is set to 1 by default.
Open File
Open the distribution network tower file(*.json) and refresh the line list and tower list.
Save File
Save line and tower information to a file (*.json).
Import File
Import tower files (*.LiTower *.kml), and manually maintain the line branch relationships after importing.
Add Branch
Add a line branch. If no branch is selected in the line list, create a main branch. If a tower of a branch is selected, create a sub branch of that branch.
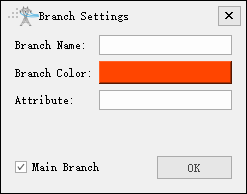
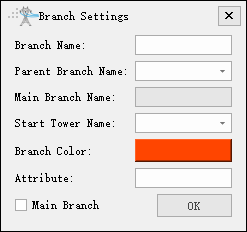
- Branch Name: Set the name of the branch line.
- Branch Color: Set the branch line color.
- Attribute: Optional input of information to be recorded.
- Parent Branch Name: Select an existing branch as the parent branch.
- Main Branch Name: read-only status, automatically updated based on the selected parent branch, used for viewing.
- Start Tower Name: Select a tower from the parent branch as the starting tower.
- Main Branch: If no tower is selected for adding a branch, it is selected by default. Otherwise, it is not selected. If it is not selected, the parent branch and starting tower need to be set.
- Click "OK" to create a new branch and update the line list.
Modify Branch
To use this function, you should first select the branch to be modified in the line list before making any modifications. The modification items are consistent with "Add Branch".
Delete Branch
Delete the currently selected branch and its subordinate branches, as well as the tower records under these branches.
Clear Line List
Clear all line and tower records.
Add Tower Backward
Add a tower record after currently selected record.
Add Tower Forward
Add a tower record before currently selected record.
Delete Tower
Delete the current selected tower record.
Modify Tower Position
Modify the position of the selected tower.
Generate Working Directory
Generate the corresponding working directory for each branch, and output the working directory and tower file (*.LiTower) for each branch according to the specified output path.
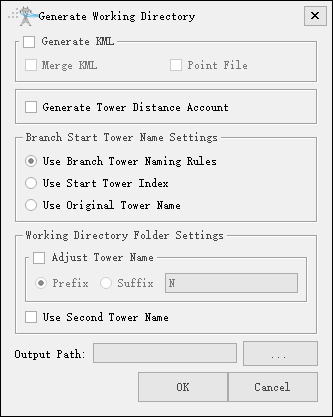
- Generate KML: It is not selected by default. If selected, a KML file will be generated, otherwise it will not be generated.
- Merge KML: Not selected by default. When generating KML, selecting "Merge KML" will generate a merged KML to the output path, otherwise it will not be generated.
- Point File: Not selected by default. When generating KML, selecting "Point File" will generate a point file to the output path, otherwise it will not be generated.
- Generate Tower Distance Account: It is not selected by default. If selected, a tower distance account will be generated; otherwise, it will not be generated.
- Use Branch Tower Naming Rules: It is selected by default. If selected, according to the naming rules for branch line towers, set the name of the starting tower for the branch line.
- Use Start Tower Index: It is selected by default. If selected, use the starting tower index of the branch line as the tower name.
- Use Original Tower Name: It is not selected by default. If selected, use the tower name from the previous level of the line as the starting tower name for the branch line.
- Adjust Tower Name: It is not selected by default. If selected, set the prefix or suffix of the tower name in the working directory folder name.
- Use Second Tower Name: It is not selected by default. If selected, Check this option to use the name of the second tower as the starting tower name for lines with parent branches. In other cases, use the name of the first tower as the starting tower name.
- Output path: Select the output path.
- Click "OK" to output the working directory and specify the output file.
Batch Clip Section
Batch clip point cloud data based on the marking results of the distribution network towers. The functional interface is shown in the following figure, click![]() to add pending data, click
to add pending data, click![]() to remove the selected data, click
to remove the selected data, click![]() to clear the data list.
to clear the data list.
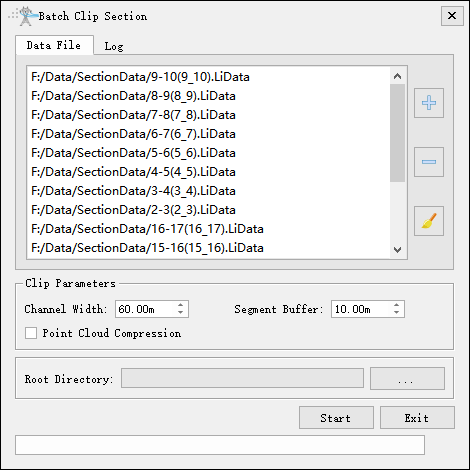
- Channel width(meters)(default to "60"): The width that extends along the direction of the power line towards both sides. The software can record the user's current settings and automatically restore them when opened again.
- Extension length(meters)(default to "10"): The extension distance at both ends of the tower.
- Point cloud compression(not selected by default): Perform thinning on the processed data.
- Root directory: Set the output root directory.
Batch Edit Tower Names
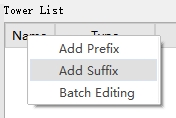
Right click on the "Name" column header of the tower list, and a selection menu will pop up as shown in the following figure, including "Add Prefix", "Adding Suffix", and "Batch Editing". It can be used to add prefix, suffix, or simultaneous edit the tower names.
Batch Edit Tower Types
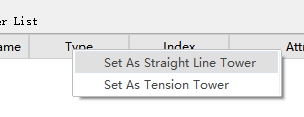
Right click on the "Type" column header of the tower list, and a selection menu will pop up as shown in the following figure, including "Set As Straight Line Tower" and "Set As Tension Tower". User can modify the tower type as straight line tower or tension tower in batches.
