Exercise 1: One-step Process Generating Orthomosaic and Terrain Models
One of the most apparent features GVI’s of LiMapper is the software’s smooth and efficient user experience. Complicated processing operations are streamlined by LiMapper into intuitive workflows. By following the one-step process outlined in this tutorial, users can generate orthomosaic imagery and terrain models with minimal effort using preset parameters that have been tested and proven to create high quality results. Users should note that the LiMapper is highly flexible and the only required portion of the workflow outlined in this tutorial is the step taken to create a new project.
Create New Project
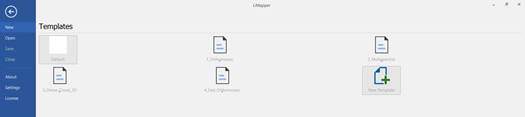
1 Launch LiMapper ![]() > New.
> New.
2 Select the preset template 1_Orthomosaic. A project template is a pre-defined workflow for a project with customized processing parameters saved. In this exercise, since our goal is to generate orthomosaic imagery and surface models, we can use the 1_Orthomosaic template.
3 Type in a Project name and select Project location directory. Click Next.
4 In New Project Wizard, load photos and specify photo properties.
4.1 Select Rig Type. Nadir, Oblique, and Multispectral photos are supported in LiMapper.
4.2 Click ![]() to browse to and import the aerial photos included in the sample data folder.
to browse to and import the aerial photos included in the sample data folder.
4.3 Edit image POS data.
LiMapper uses flight trajectory or POS information to speed up processing and to georeference output products generated from aerial imagery. LiMapper can read coordinates (longitude, latitude, altitude) embedded in photo EXIF, and coordinates stored in separate POS file (.txt or .csv).
4.3.1 If POS is embedded in photo EXIF: Click Edit under Image Geolocation to specify the coordinate system for the input imageries. If external POS file need to be used, skip this step and go to next.
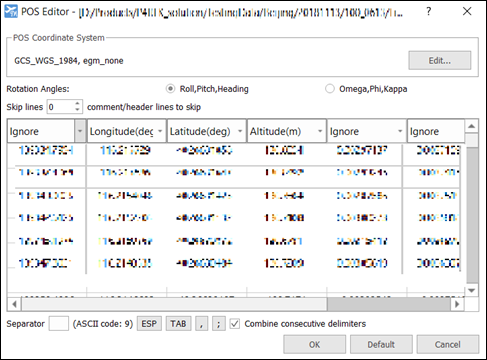
4.3.2 If separate POS file is used: Click ![]() to import POS file. Then in POS Editor window, click Edit to select POS Coordinate System. Skip Lines to skip the header row if necessary. Match the columns with these necessary inputs: Longitude, Latitude, Altitude. For other columns, select Ignore. Click OK to save settings.
to import POS file. Then in POS Editor window, click Edit to select POS Coordinate System. Skip Lines to skip the header row if necessary. Match the columns with these necessary inputs: Longitude, Latitude, Altitude. For other columns, select Ignore. Click OK to save settings.
Select Default when Vertical Coordinate System is ellipsoid height.
4.4 Click Next.
5 Select Output Coordinate System. The default Horizontal Coordinate System is the auto detected UTM zone for the project area, and the default Vertical Coordinate System would be the same as the input Vertical Coordinate System. Click Finish.
Select Output Products
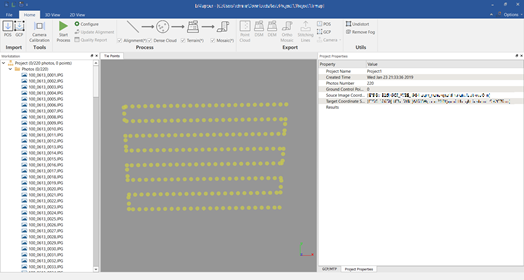
In the Process ribbon, a streamlined workflow has been created and will run in sequence to perform a Photo Alignment, process a Dense Cloud, and generate Terrain models and a Mosaic map, once user clicks Start Process. Before running the automated process, user can customize processing and output parameters.
6 Under Home, click Configure ![]() in Process ribbon.
in Process ribbon.
7 Accept default parameters for Align Photos and Build Dense Cloud.
8 Click Build DEM/DSM. Select/unselect Build DSM/Build DEM to control what terrain models are generated. Change the Resolution if needed.
- DEM: Digital Elevation Model;
- DSM: Digital Surface Model
9 Click Build Orthomosaic. Select a mode to generate Orthomosaic imagery. Change Resolution if needed.
The default mode Pixel-level mosaic based on surface model has the best performance and fast processing speed under most circumstances. Navigate through the modes and read their descriptions to select one that is appropriate for your surveying environment.
10 Click OK.
Start Process
11 Click Start Process ![]() to run the streamlined process.
to run the streamlined process.
Export Products
12 When the LiMapper workflow has finished, the Dense Points, Orthomosaic map, and DEM/DSM can be exported to .ply file and .tiff file. In Export ribbon, click the product to export, and navigate through the export wizard.
13 The POS of images, GCPs, and photos after distortion correction can also be exported using options included in the Export ribbon.
